
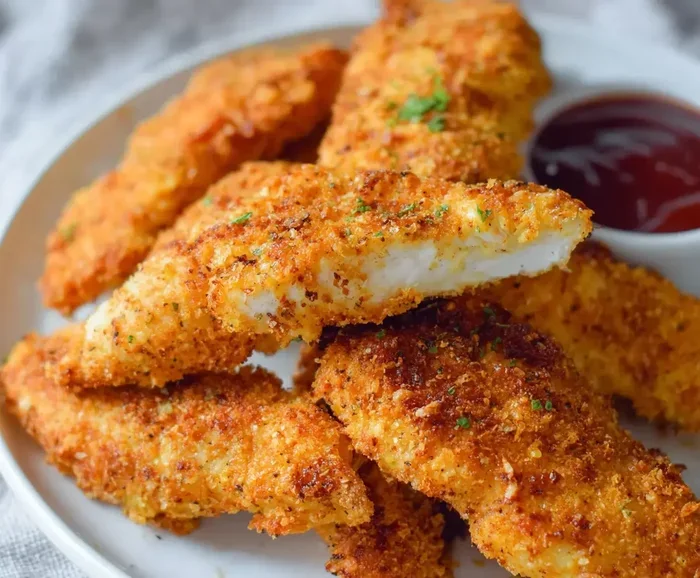
Cooking chicken tenders in an air fryer with flour gives you a crispy, golden coating without the mess of deep frying. This method is fast, healthy, and perfect for busy weeknights when you want something delicious but simple. You only need a few basic ingredients like chicken, flour, and your favorite seasonings to get started. The air fryer circulates hot air to cook the tenders evenly while keeping them juicy inside. Follow this easy guide to make the best homemade chicken tenders your family will love.
If you love crispy chicken but hate the hassle of deep frying, you are in the right place. How to cook chicken tenders in air fryer with flour is a game changer for busy home cooks. You get that golden crunch you crave with way less oil and way less cleanup. It feels like a treat but fits right into a balanced meal plan. Plus, it takes almost no time at all.
Many people think air fryers only handle frozen snacks or veggies. That is simply not true. You can make fresh, homemade chicken tenders that beat takeout any day. The flour coating creates a light crust that turns beautifully crisp in the circulating heat. It is simple, reliable, and incredibly satisfying. Let us walk through everything you need to know.
Key Takeaways
- Prep is simple: Pat the chicken dry and mix flour with spices for a crunchy coating.
- Temperature matters: Cook at 400°F for the best crispy texture without drying out the meat.
- Flip halfway: Turn the tenders over during cooking to ensure even browning on all sides.
- Don’t overcrowd: Leave space between pieces so the hot air can circulate properly.
- Check doneness: Use a meat thermometer to confirm the internal temperature reaches 165°F.
- Serve immediately: Chicken tenders taste best right out of the air fryer while still hot and crisp.
- Customize flavors: Add garlic powder, paprika, or Parmesan to the flour for extra taste.
📑 Table of Contents
Why Air Fryer Chicken Tenders Are a Smart Choice
Choosing an air fryer for your homemade chicken tenders saves you time and effort. Traditional frying requires a pot of hot oil, constant monitoring, and a sink full of greasy dishes. The air fryer does all the work with a simple basket and a few minutes of your attention. You get the same satisfying crunch without the heavy mess.
Another big win is the texture. The rapid air circulation mimics deep frying by hitting every side of the food at once. When you coat your chicken tenders in flour, that hot air locks onto the seasoning and creates a tight, crunchy shell. The inside stays tender and juicy because the cooking time stays short. It is a perfect balance of crisp and soft.
This method also fits busy schedules. You can prep the coating while the air fryer heats up. Then you drop the pieces in and let the machine do its thing. While they cook, you can toss together a quick dipping sauce or set the table. It is a stress free way to serve a crowd pleasing dinner.
Less Oil, More Flavor
You might wonder if using less oil means less taste. The truth is, flavor comes from your seasoning and your technique. A well mixed flour blend carries spices deep into the coating. The air fryer then seals that flavor against the meat. You still get bold, savory bites without soaking the chicken in fat.
Faster Cleanup
Cleanup is one of the best parts of this approach. Most air fryer baskets are nonstick and wipe clean with a damp cloth. You avoid splattered stovetops and greasy pans. That means more time enjoying your meal and less time scrubbing the kitchen. It is a small change that makes a big difference on weeknights.
What You Need Before You Start
Gathering your ingredients and tools ahead of time keeps the process smooth. You do not need fancy equipment. A basic air fryer, a few pantry staples, and some fresh chicken are all it takes. When everything is ready, you can move from prep to plate without delays.
Start with good quality chicken tenders. You can buy them pre cut or slice your own from chicken breasts. Fresh pieces give you the best texture and flavor. Then pick a flour that fits your taste. All purpose flour works perfectly, but you can also mix in cornstarch for extra crunch or use gluten free flour if needed.
Keep your seasonings simple at first. Salt, black pepper, garlic powder, and paprika cover the basics beautifully. You can always add more later once you know what your family likes. A small bowl for the flour mix and a plate for dredging will keep your workspace tidy.
Basic Ingredients List
Here is a quick list of what you will need for a standard batch:
- Chicken tenders: About one to one and a half pounds for a family meal
- All purpose flour: One cup is usually enough for a light, even coat
- Salt and pepper: To taste, but do not be shy with the salt
- Garlic powder: Adds a savory depth that everyone loves
- Paprika: Gives a warm color and mild sweetness
- Cooking spray or a light oil brush: Helps the flour brown evenly
- Optional dips: Honey mustard, ranch, or ketchup for serving
Tools That Make It Easier
You do not need much, but a few simple tools help a lot. Tongs are great for turning the tenders without touching the hot basket. A shallow dish works well for the flour mixture. A meat thermometer takes the guesswork out of doneness. And of course, your air fryer is the star of the show.
How To Cook Chicken Tenders In Air Fryer With Flour
Now let us get into the step by step process. This is the core of how to cook chicken tenders in air fryer with flour, and it is easier than it sounds. Follow these steps and you will get a steady, crispy result every time.
Step One: Prep the Chicken
Pat the tenders dry with paper towels. Moisture on the surface can make the coating soggy instead of crisp. Once they are dry, you can season them lightly with salt if you like. This small step helps the flour stick and builds flavor from the outside in.
Step Two: Mix the Flour Coating
In a shallow bowl, combine your flour with your chosen spices. A good starting mix is one cup of flour, half a teaspoon of salt, a quarter teaspoon of black pepper, one teaspoon of garlic powder, and one teaspoon of paprika. Stir it well so every spoonful tastes the same. You want the coating to carry flavor, not just crunch.
Step Three: Dredge the Tenders
Working one piece at a time, press the chicken into the flour mixture. Coat both sides evenly and shake off any loose bits. Too much extra flour can burn in the air fryer and leave a dusty taste. A thin, even layer is all you need for that golden finish.
Step Four: Arrange in the Basket
Place the coated tenders in the air fryer basket in a single layer. Leave a little space between each piece so the hot air can move around them. If you stack them, they will steam instead of crisp. You may need to cook in batches if your basket is small.
Step Five: Cook and Flip
Set your air fryer to 400°F. Cook the tenders for about eight to ten minutes, then flip them over. This helps both sides brown evenly. After flipping, cook for another three to five minutes until the outside is deeply golden and the inside reaches a safe temperature.
Step Six: Check and Serve
Use a meat thermometer to check the thickest part of a tender. You are looking for 165°F. If they need a little more time, add one or two minute increments. Once they are done, pull them out and let them rest for a minute before serving. This short rest keeps the juices inside.
Tips for Extra Crispy Results
If you want that restaurant style crunch, a few small tricks make a big difference. These tips focus on texture, heat, and coating technique. Try one or two at a time until you find your favorite combo.
Use a Light Oil Spray
A quick mist of cooking spray over the floured tenders helps the coating brown and crisp. You do not need much. Just a light pass over the top is enough. This small step encourages that deep golden color without adding heavy grease.
Try a Flour and Cornstarch Blend
swapping a quarter of your flour for cornstarch can boost crunch. Cornstarch creates a lighter, crispier shell than flour alone. It is an easy upgrade that works especially well if you like a shatteringly crisp bite. Just keep the seasoning mix the same so the flavor stays balanced.
Keep the Heat Steady
Air fryers vary by brand, so it helps to watch the first batch closely. If your machine runs hot, drop the temperature by 10 to 20 degrees. If it runs cool, add a minute or two. Once you learn your appliance, you can repeat the same timing with confidence.
Common Mistakes to Avoid
Even a simple recipe can go sideways if a few easy mistakes slip in. Knowing what to watch for keeps your crispy chicken tenders on track. These are the most common pitfalls and how to fix them.
Overcrowding the Basket
Packing too many pieces into the basket blocks airflow. The result is soft, pale spots instead of an even crust. Give each tender some breathing room. If needed, cook in two rounds. The extra few minutes are worth the better texture.
Skipping the Dry Step
Wet chicken leads to clumpy flour and uneven browning. Always pat the tenders dry before dredging. This quick step helps the coating adhere and crisp up properly. It takes seconds and pays off in the final result.
Under Seasoning the Flour
Flour without seasoning tastes bland no matter how crisp it is. Taste your flour mix before you start dredging. It should taste mildly salty and fragrant. If it tastes flat, add a bit more salt or spices. The coating is the flavor carrier, so do not be timid.
Not Flipping Halfway
Flipping the tenders ensures both sides get direct heat. Skip this step and one side may stay pale while the other darkens too much. A quick turn in the middle solves that problem. Use tongs and handle the pieces gently so the coating stays intact.
Serving Ideas and Flavor Variations
Once you master the basics, you can play with flavors and pairings. Air fryer chicken tenders are wonderfully flexible. You can keep them classic or twist them into something new depending on the mood.
Dipping Sauces That Shine
A good dip turns simple tenders into a full experience. Honey mustard adds a sweet tang that balances the savory crust. Ranch brings a cool, creamy contrast. If you like heat, mix a little hot sauce into mayo for a quick spicy dip. Serve them on the side and let everyone choose their favorite.
Seasoning Twists
You can change the flavor profile by adjusting the flour mix. Add dried herbs like thyme or oregano for an herby note. Stir in a little grated Parmesan for a rich, umami kick. For a bolder bite, include a pinch of cayenne or chili flakes. Each variation keeps the same easy method but gives you a different result.
Sides That Complete the Meal
Pair your tenders with sides that are just as easy. A simple green salad with a light vinaigrette keeps the meal fresh. Roasted veggies like broccoli or carrots cook well alongside the chicken in a separate batch. If you want something comforting, try mashed potatoes or a small portion of rice. The goal is a balanced plate that feels satisfying without being heavy.
Expert Insights for Consistent Success
A few small habits separate good results from great ones. These insights come from testing what works in a typical home kitchen. Use them to build confidence and make the recipe your own.
Let the Coated Chicken Rest Briefly
After dredging, let the tenders sit for a minute or two before cooking. This short pause helps the flour settle and stick better. It reduces loose flakes in the basket and improves the final crust. You do not need a long rest, just enough time for the coating to set.
Work in Small Batches
It is tempting to fill the basket all at once, but small batches cook more evenly. When the air can flow freely, every piece gets the same chance to crisp. If you are feeding a crowd, stage the batches and keep the finished ones warm on a rack in a low oven. That way everyone gets the same great texture.
Track Your Timing
Every air fryer behaves a little differently. Write down what worked for your machine, including temperature and minutes. After a couple of tries, you will have a reliable routine. That makes future meals faster and removes the guesswork.
Key Takeaways
To wrap up the essentials, remember these core points:
- Dry the chicken first for a coating that sticks and crisps well.
- Season the flour generously so every bite has flavor.
- Cook at 400°F and flip halfway for even browning.
- Leave space in the basket so the hot air can do its job.
- Check the internal temperature to ensure safe, juicy results.
With these basics, how to cook chicken tenders in air fryer with flour becomes a quick, repeatable habit. You get a crispy, satisfying meal without the hassle of traditional frying. Once you try it, you will likely keep coming back to this simple method.
Frequently Asked Questions
How long do I cook chicken tenders in the air fryer?
Cook them at 400°F for about 8 to 10 minutes, then flip and cook 3 to 5 minutes more. The exact time depends on the size of your tenders and your air fryer model. Always check that the inside reaches 165°F before serving.
Do I need to use oil when cooking chicken tenders with flour?
You do not need much oil, but a light spray helps the flour brown and crisp. A small amount of oil improves texture without making the meal heavy. If you skip it, the tenders may still crisp, just with a slightly lighter color.
Can I use cornstarch instead of flour for the coating?
Yes, you can use cornstarch or a blend of flour and cornstarch for a crunchier crust. Cornstarch tends to create a lighter, crispier finish than flour alone. Keep your seasoning mix the same so the flavor stays balanced.
How do I keep the coating from falling off the chicken?
Pat the chicken dry first, then press the flour on firmly so it adheres well. A brief rest after dredging also helps the coating set before cooking. Avoid overcrowding the basket so the tenders do not steam and loosen the crust.
What temperature is best for air fryer chicken tenders?
400°F works well for most recipes because it gives a good balance of browning and cooking speed. If your air fryer runs hot, you can lower it slightly and add a minute or two. The goal is a golden crust with a fully cooked interior.
Can I cook frozen chicken tenders with flour in the air fryer?
It is best to thaw the chicken first so the flour coating sticks and cooks evenly. Frozen tenders can work, but the coating may not brown as well and the cooking time will vary. For the crispiest result, start with fresh or fully thawed chicken.



