
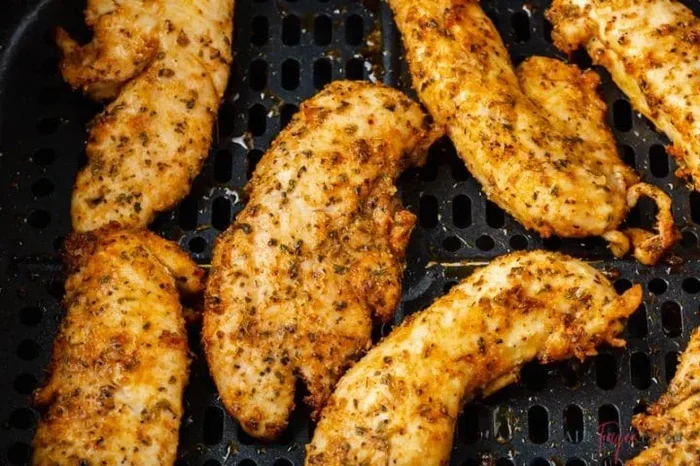
Cooking unbreaded chicken tenders in air fryer is fast, healthy, and delivers a golden, crispy finish without heavy oil. With the right temperature, spacing, and a light coating, you get juicy meat inside and a satisfying crunch outside. This guide walks you through exact times, simple seasoning ideas, and easy tricks to avoid dry or soggy results. You will learn how to cook chicken tenders in air fryer with confidence and get dinner on the table in minutes.
This is a comprehensive guide about How To Cook Unbreaded Chicken Tenders In Air Fryer.
Key Takeaways
- Right temperature: 380°F to 400°F works best for unbreaded chicken tenders in air fryer to get a crispy coating without burning.
- Light coating helps: A thin layer of oil or a dusting of flour or cornstarch creates golden crispiness on plain chicken.
- Don’t overcrowd: Single-layer spacing lets hot air circulate for even cooking and better texture.
- Flip halfway: Turning the tenders once ensures both sides brown evenly and cook through.
- Check doneness: Aim for 165°F internal temperature for safe, juicy air fryer chicken tenders.
- Rest briefly: A short rest after cooking keeps juices inside and improves the final bite.
- Season well: Simple salt, pepper, garlic, and paprika boost flavor without heavy breading.
[FEATURED_IMAGE_PLACEHOLDER]
Why Cook Unbreaded Chicken Tenders In Air Fryer
Air frying plain chicken tenders is a smart choice when you want a crispy texture without heavy breading. You get a lighter meal that still feels satisfying. The rapid hot air circulation browns the surface quickly, so you can enjoy a golden finish with far less oil than pan-frying.
This method also saves time. You do not need to wait for a skillet to heat up or deal with splatter. A quick prep and a set temperature are enough to get great results. If you like simple weeknight dinners, this is one of the easiest ways to cook chicken.
Another benefit is control. You can adjust the heat and time to match the size of your tenders. Smaller pieces cook faster, while thicker ones need a little more time. That flexibility makes it simple to get juicy meat and a crisp exterior in the same batch.
What Makes Unbreaded Tenders Different
Unbreaded tenders lack a flour or batter shell, so the surface can dry out if you cook them too long. The key is to protect the meat while still creating a crisp layer. A light coating of oil helps the surface brown. A small dusting of starch or flour can add texture without making it feel heavily coated.
Plain chicken also picks up seasoning more directly. Salt, pepper, garlic, paprika, and herbs land on the meat instead of sitting on top of breadcrumbs. That means you can build flavor with very few ingredients. If you want a clean label meal, this is a great option.
Who This Method Is Best For
This approach works well for families who want a quick protein option. It is also useful for meal prep, because plain chicken tenders can be added to salads, wraps, and bowls later. If you prefer a lighter fry-up, this method gives you a crunchy bite without extra heaviness.
It is also a good fit if you are cooking for kids and want a simple, familiar shape. Tenders are easy to eat and easy to season in ways that suit different tastes. You can keep one batch mild and another batch spicier, depending on your needs.
Best Temperature And Time For Unbreaded Chicken Tenders In Air Fryer
Getting the right balance of heat and time matters a lot. Too low, and the surface stays pale. Too high, and the outside can darken before the inside finishes. For most unbreaded chicken tenders in air fryer cooking, a temperature between 380°F and 400°F is a strong starting point.
At 380°F, the tenders cook gently and stay juicy. At 400°F, you get a faster finish and a bit more browning. If your tenders are small and uniform, 400°F can work well. If they vary in size, 380°F gives you a little more margin to avoid overcooking.
Suggested Starting Times
A typical batch of fresh chicken tenders usually needs around 10 to 14 minutes total. Frozen tenders usually need a bit longer, often 14 to 18 minutes, depending on thickness. These are starting points, so check early and adjust as needed.
Here is a simple reference you can use:
- Fresh tenders, 380°F: 12 to 14 minutes, flip halfway
- Fresh tenders, 400°F: 10 to 12 minutes, flip halfway
- Frozen tenders, 380°F: 14 to 16 minutes, flip halfway
- Frozen tenders, 400°F: 12 to 15 minutes, flip halfway
Always verify the center temperature if you have a thermometer. You want the thickest part to reach 165°F. If you do not have one, cut the largest tender open and check that it is no longer pink.
Adjusting For Size And Thickness
Not all tenders are the same. Some are slender and cook quickly. Others are thicker and need more time. If your pieces differ a lot, try to group similar sizes together. That makes it easier to get an even result.
If you notice the outside browning too fast, lower the temperature by 10 to 20 degrees and add a couple of minutes. If the surface looks pale, raise the heat slightly near the end. Small adjustments can make a big difference in the final texture.
How To Get A Crispy Coating Without Breading
You do not need breadcrumbs to get a crisp surface. A light coating of oil is one of the simplest tools. It helps heat transfer and encourages browning. A tiny amount goes a long way, so there is no need to soak the chicken.
Another option is a very thin dusting of flour, cornstarch, or rice flour. This creates a slight barrier that can crisp up without feeling like a heavy crust. If you want a cleaner flavor, cornstarch gives a lighter finish. If you want a bit more structure, flour works nicely.
Simple Coating Ideas
You can keep this very basic. A little oil, salt, and pepper is enough for a clean, crisp result. If you want more flavor, add garlic powder, onion powder, paprika, or dried herbs. The goal is to season the surface, not coat it heavily.
Here are a few easy combinations:
- Classic: Olive oil spray, salt, black pepper, garlic powder
- Smoky: Oil, paprika, salt, pepper, a pinch of cayenne
- Herb light: Oil, dried oregano, thyme, salt, pepper
- Extra crisp: Light cornstarch dusting, oil, salt, pepper
Toss the tenders gently so the coating stays thin and even. Too much powder can look dusty instead of crisp. A light hand usually gives the best texture.
Why Oil Spray Helps
A light oil spray improves browning and helps seasonings stick. It also reduces the chance of the surface drying out too quickly. You do not need a heavy glaze. Just a fine mist before cooking and maybe one more spray halfway through is enough.
If you prefer less fat, use a small amount of oil on the surface rather than a deep coating. The air fryer does most of the work. Your job is simply to help the outside respond well to the heat.
Step By Step: How To Cook Unbreaded Chicken Tenders In Air Fryer
This process is simple, but a few small details improve the result. Start with dry chicken, because moisture on the surface can slow browning. Season early so the flavor has time to settle. Then arrange the pieces carefully so air can move around them.
Prep The Chicken
Pat the tenders dry with paper towels. If they are very wet, the surface may steam instead of crisp. After drying, toss them with a light coating of oil and your chosen seasoning. If you want a slight crust, add a thin dusting of starch or flour now.
If you are working with frozen tenders, separate any stuck pieces first. You do not need to fully thaw them, but breaking them apart helps them cook evenly. A little extra time may be needed, so check them toward the end.
Arrange And Cook
Place the tenders in a single layer with a little space between each piece. Overcrowding traps steam and lowers crispiness. If you have a lot to cook, do it in batches. The extra few minutes are worth the better texture.
Set the temperature and time based on fresh or frozen chicken. Flip the tenders halfway through so both sides brown evenly. If you want a stronger finish, you can add one or two extra minutes at the end, but check often to avoid drying them out.
Check And Serve
When the timer ends, check the largest tender first. The center should be fully cooked and the outside should look golden. If needed, add a short extra burst of time. Let the chicken rest for a few minutes before serving so the juices settle.
Serve them hot for the best bite. Plain tenders work well with dips, salads, rice, or roasted vegetables. If you want a stronger flavor, a quick brush of sauce after cooking can add variety without softening the crust too much.
Common Mistakes And How To Fix Them
Even a simple recipe can go sideways if a few basics are missed. The good news is that most issues are easy to correct. A little attention to spacing, timing, and surface prep goes a long way.
Too Pale Or Soft
If the tenders look pale, the heat may be too low or the surface too wet. Dry the chicken better next time and raise the temperature slightly. A light oil spray can also help the surface brown more effectively.
If the texture is soft, overcrowding may be the cause. Give the pieces more room so the hot air can reach each side. Cooking in batches often solves this quickly.
Too Dry Or Tough
Overcooking is the usual reason for dry chicken. Pull the tenders when they hit the right temperature instead of waiting for extra browning. If they are browning too fast, reduce the heat a little and cook a bit longer.
Thicker pieces can also dry out if the heat is too aggressive. For larger tenders, a gentler temperature helps the center cook without overdoing the outside.
Uneven Browning
Uneven color often comes from uneven spacing or different sizes. Arrange the tenders in a neat single layer and try to keep similar pieces together. Flip them halfway through so each side gets equal exposure.
If your air fryer has hot spots, rotate the basket or tray if your model allows it. A small shuffle can help the batch cook more evenly.
Flavor Variations And Serving Ideas
Plain chicken tenders are a flexible base. You can keep them simple or turn them into a full meal with very little extra effort. Since there is no heavy breading, the flavor stays clean and adaptable.
Easy Seasoning Paths
You can build different flavor profiles with small changes. A basic blend works for everyday dinners. A spicier mix suits anyone who likes heat. A herby version pairs nicely with vegetables and grains.
- Kid friendly: Salt, pepper, garlic powder, light oil
- Southwest: Paprika, cumin, chili powder, salt, pepper
- Mediterranean: Dried oregano, thyme, garlic, salt, lemon zest after cooking
- Savory crunch: Light cornstarch, salt, pepper, onion powder
You can also season after cooking with a finishing pinch of salt or a splash of lemon juice. That adds brightness without changing the crisp surface too much.
Simple Sides And Uses
These tenders fit into many meals. They work as a main dish with vegetables, or they can be sliced into salads and wraps. They also make a handy protein for meal prep, since they reheat reasonably well and keep their shape.
If you want a fuller plate, pair them with roasted potatoes, rice, or fresh greens. A dipping sauce can add variety without changing the cooking method. This is one of those meals that stays easy while still feeling complete.
Quick Tips For Better Air Fryer Chicken Tenders
A few small habits can improve every batch. Use these as a quick checklist before you start.
- Keep it dry: Pat the chicken dry before seasoning for better browning.
- Light coating: Use a small amount of oil or a thin dusting for crispy chicken tenders.
- Single layer: Give the pieces room so air can circulate.
- Flip once: Turn the tenders halfway through for even color.
- Check early: Start checking near the lower end of the time range.
- Rest briefly: Let the chicken sit for a few minutes before serving.
- Adjust as needed: Change time or temperature based on size and thickness.
Conclusion
Learning how to cook unbreaded chicken tenders in air fryer is a simple way to get a crisp, juicy meal with very little fuss. With the right temperature, a light coating, and proper spacing, you can enjoy crispy chicken tenders without heavy breading. The process is quick, flexible, and easy to adjust for fresh or frozen chicken. Once you get the timing right, you can repeat it with confidence and make a reliable dinner any night of the week.
Frequently Asked Questions
How long should I cook unbreaded chicken tenders in an air fryer?
Fresh unbreaded chicken tenders usually take about 10 to 14 minutes at 380°F to 400°F, depending on size. Frozen tenders often need a little longer, around 14 to 18 minutes. Always check the thickest piece near the end so you do not overcook it.
Do I need oil for unbreaded chicken tenders in the air fryer?
You do not need much, but a light coating of oil helps the surface brown and crisp. A quick spray or a small toss with oil is usually enough. Without any oil, the outside may stay pale and dry.
How can I make unbreaded chicken tenders crispy without breading?
Pat the chicken dry, use a light oil coating, and season the surface well. A very thin dusting of cornstarch or flour can also add crispness. Cooking in a single layer with a flip halfway through gives the best texture.
What temperature is best for air fryer chicken tenders?
A good range is 380°F to 400°F. Lower heat helps keep the tenders juicy, while higher heat gives faster browning. If your pieces are small and uniform, 400°F usually works well.
How do I know when unbreaded chicken tenders are done?
The safest check is an internal temperature of 165°F in the thickest part. If you do not have a thermometer, cut one tender open and make sure it is fully opaque with no pink. If needed, add a minute or two and check again.
Can I cook frozen unbreaded chicken tenders in the air fryer?
Yes, you can cook them from frozen, but they usually need more time than fresh ones. Separate any stuck pieces first and cook them in a single layer if possible. Start checking a little later in the cycle so the inside cooks through without over-browning the outside.



