
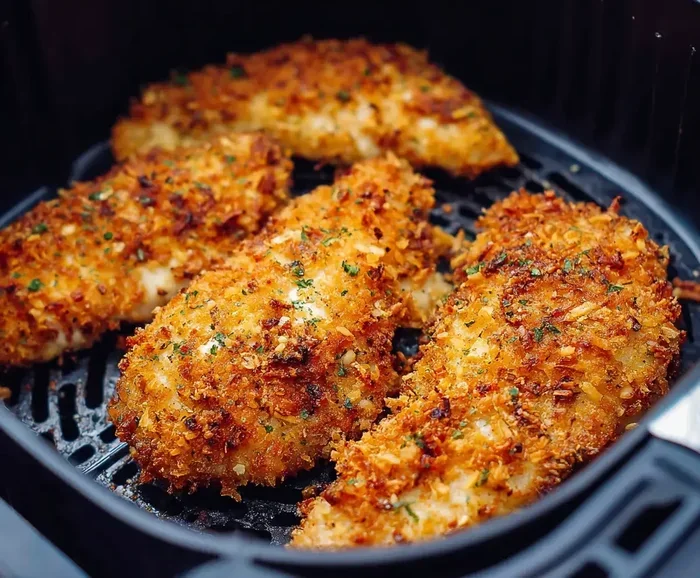
Cooking chicken in an air fryer at 400 degrees delivers crispy, golden results fast. Most chicken pieces need 15 to 25 minutes, depending on size and cut. Always check the internal temperature to reach 165°F for safety. This method saves time and keeps your kitchen clean.
Key Takeaways
- Timing varies by cut: Chicken breasts take 15-20 minutes, while thighs need 20-25 minutes at 400 degrees.
- Flip halfway through: Turning the chicken ensures even browning and crispy skin on both sides.
- Use a meat thermometer: Always verify the internal temperature hits 165°F before serving.
- Preheat your air fryer: A hot basket helps start the crisping process immediately for better texture.
- Don’t overcrowd the basket: Leaving space allows hot air to circulate and cook the chicken evenly.
- Pat chicken dry first: Removing moisture helps seasoning stick and improves the final crispiness.
- Let it rest after cooking: Resting for five minutes keeps the juices inside for a juicier bite.
📑 Table of Contents
Why 400 Degrees is the Sweet Spot for Air Fryer Chicken
Cooking poultry at high heat works wonders. When you set your machine to 400 degrees, you get a searing effect. This mimics deep frying without the oil mess. The high temperature renders fat quickly. It also browns the outside before the inside dries out.
Many people worry about drying out their meat. But 400 degrees is actually safe for most cuts. It balances speed and texture perfectly. You get that desirable crunch on the outside. Meanwhile, the inside stays tender and juicy. This temperature is ideal for frozen items too. It thaws and cooks simultaneously in many cases.
Using this setting saves you time. You do not need to preheat for long. The heating element reaches target temp fast. This makes weeknight dinners much easier. You can toss ingredients in and walk away. Just set the timer and check halfway. It is a reliable method for consistent results.
The Science of Crispy Skin
Air fryers work by circulating hot air. This convection effect removes surface moisture. Moisture is the enemy of crispiness. When water evaporates quickly, the skin browns. At 400 degrees, this evaporation happens faster. Lower temps might steam the skin instead. You want dry heat for the best texture.
Seasoning plays a big role too. Salt draws out moisture slightly. This helps the skin tighten up. Adding a little oil spray enhances the effect. It helps the spices stick and brown. You do not need much oil to get great results. A light coating is usually enough for success.
Comparing 400 Degrees to Lower Temps
Some recipes suggest 350 degrees. This works for larger roasts. But for standard cuts, 400 is better. At 350, the cooking time increases. Longer time means more chance for dryness. High heat seals the juices in faster. It also reduces the overall cooking window. You spend less time waiting for dinner.
How Long Chicken Air Fryer 400 Degrees Takes by Cut
Timing depends heavily on the piece size. A whole breast cooks differently than wings. You must adjust your expectations based on the cut. Bone-in pieces take longer than boneless. Skin-on chicken needs more time to crisp. Always keep an eye on the clock. These are general guidelines for best outcomes.
Chicken Breasts at 400 Degrees
Boneless breasts are very popular. They cook quickly at this temperature. Expect them to take 15 to 20 minutes. Flip them halfway through the process. If they are thick, they might need more time. Pounding them flat helps them cook evenly. This ensures no dry edges or raw centers.
For bone-in breasts, add extra time. They usually need 25 to 30 minutes. The bone conducts heat slower. Check the thickest part for doneness. You want clear juices when you pierce it. Using a thermometer is the safest bet here.
Chicken Thighs and Drumsticks
Dark meat handles high heat well. Thighs are forgiving and stay juicy. Cook them for 20 to 25 minutes at 400 degrees. Drumsticks might need 25 to 30 minutes. The skin on thighs gets very crispy. This is a favorite cut for air frying. They hold up well without drying out.
You can cook these from frozen too. Just add a few extra minutes. The high heat helps render the fat. This makes the skin taste amazing. No need to thaw overnight for this method. It is perfect for busy weeknight schedules.
Chicken Wings and Tenderloins
Wings are small and cook fast. They need about 18 to 22 minutes. Toss them in sauce after cooking. This keeps the skin crisp under the glaze. Tenderloins are even smaller. They might only need 10 to 12 minutes. Watch them closely so they do not burn.
These smaller cuts are great for snacks. You can batch cook them easily. Just do not stack them too high. Air needs to flow around each piece. Single layers work best for crispiness. This ensures every wing gets crunchy.
Preparing Your Chicken for Maximum Crispiness
Prep work matters just as much as timing. You cannot just throw raw meat in the basket. A little effort goes a long way. Start by patting the chicken dry. Paper towels remove surface moisture effectively. Dry skin equals better browning every time.
Next, consider your seasoning blend. Salt and pepper are basics. But garlic powder and paprika add depth. You can use a dry rub or marinade. If using wet marinade, shake off excess. Too much liquid prevents crisping. Oil spray helps conduct the heat evenly.
The Role of Oil and Seasoning
You do not need deep frying oil. A light mist is sufficient for air frying. Olive oil or avocado oil works well. They have high smoke points too. This prevents burning at 400 degrees. Spray the chicken lightly before cooking. This helps the spices adhere better.
Season generously for flavor. Chicken can be bland without it. Mix your spices in a bowl first. Toss the pieces until coated. Let it sit for ten minutes if possible. This allows the salt to penetrate slightly. Your taste buds will thank you later.
Preheating the Air Fryer
Preheating is often overlooked. But it helps start the cooking immediately. Set your machine to 400 degrees for three minutes. An empty basket gets hot quickly. When you add chicken, the searing starts right away. This reduces sticking and improves texture.
Some models heat up faster than others. Check your manual for specific advice. Generally, a short preheat is beneficial. It ensures the internal temp rises faster. You get more consistent results overall. It is a small step with big rewards.
Cooking Techniques for Even Results
Placement in the basket is key. Do not overlap the pieces. Air needs to circulate freely. If you stack them, they steam instead of crisp. Cook in batches if necessary. This ensures every piece gets equal heat.
Flipping is another crucial step. Turn the chicken halfway through cooking. This browns both sides evenly. Use tongs to avoid piercing the meat. Piercing releases valuable juices. Keep the flip gentle and quick.
Using Accessories for Better Cooking
Sometimes a rack helps with airflow. You can find specific best air fryer tray for convection oven options online. These trays lift the chicken up. Heat reaches underneath the meat too. This prevents soggy bottoms on the chicken.
Silicone cups are great for smaller pieces. Check out best silicone muffin cups for air fryer for ideas. They hold tenderloins or nuggets securely. This makes flipping easier and safer. You can also use parchment liners. Just ensure they do not block airflow.
Checking for Doneness
Visual cues are helpful but not perfect. The meat should be golden brown. Juices should run clear when pierced. But the only sure way is temperature. Insert a thermometer into the thickest part. It must read 165 degrees Fahrenheit.
If it is under, keep cooking. Add two minute increments. Check again until it hits the target. Overcooking makes meat tough and dry. So check early and often near the end. This prevents ruined dinner plans.
Common Mistakes to Avoid
Many people overcrowd the basket. This is the number one error. Air cannot move around the food. The result is uneven cooking. Some pieces burn while others stay raw. Give everything space to breathe.
Another mistake is skipping the flip. One side gets all the heat. The other side stays pale and soft. Flipping ensures balanced browning. It also helps render fat on both sides. Do not forget this simple step.
Ignoring Internal Temperature
Guessing the doneness is risky. Visual cues can be misleading. Pink meat might hide inside. Always use a meat thermometer. It is the only way to be sure. Food safety is not worth guessing on.
Also, do not cut into it immediately. Let the chicken rest for five minutes. This allows juices to redistribute. Cutting too soon releases all the moisture. You end up with dry chicken on the plate. Patience pays off in texture.
Using Too Much Oil
More oil does not mean more crisp. It can actually make things soggy. Excess oil pools in the bottom. It smokes at high temperatures. This creates a burnt taste. A light spray is all you need.
Some people soak chicken in oil. Avoid this for air frying. The machine circulates air, not oil. You want a dry surface for browning. Save the deep frying oil for fryers. Keep your air fryer method light and healthy.
Expert Tips for Perfect Outcomes
Expert cooks have a few tricks. They recommend brining the chicken first. A simple salt water soak adds moisture. This protects the meat during high heat. Even ten minutes helps significantly.
Another tip is to use baking powder. A tiny pinch changes the pH level. This helps the skin brown faster. It creates a crunchier texture naturally. Just ensure it is aluminum-free powder. You do not want a metallic taste.
Adjusting for Frozen Chicken
Frozen chicken needs more time. Add five to ten minutes to the total. Do not thaw if you are in a rush. The high heat handles it well. Just separate pieces if they are stuck. Cook until the temp hits 165 degrees.
You might need to flip more often. Ice crystals can melt and cool the surface. Extra flipping helps evaporate the water. This ensures the skin still crisps up. It takes a bit more attention but works great.
Cleaning and Maintenance
Grease buildup affects flavor. Clean your basket after every use. Hot soapy water works well for most parts. Avoid abrasive scrubbers on non-stick surfaces. Check your best silicone egg cups for air fryer if you use them for prep. Keeping tools clean ensures food safety.
Regular maintenance extends the life. Wipe down the heating element gently. Food particles can burn there over time. This causes smoke and bad smells. A clean machine cooks better every time. It also stays odor-free in your kitchen.
Conclusion
Mastering how long chicken air fryer 400 degrees takes is simple. You just need the right timing and prep. High heat gives you crispy skin and juicy meat. Remember to flip halfway and check the temp. Avoid overcrowding for the best air circulation.
With these tips, you will cook confidently. Your weeknight dinners will be faster and tastier. Experiment with different cuts and seasonings. Soon you will have your own favorite method. Enjoy your perfectly cooked air fryer chicken.
Frequently Asked Questions
How long do I cook chicken breasts at 400 degrees in an air fryer?
Boneless chicken breasts usually take 15 to 20 minutes at 400 degrees. Flip them halfway through for even cooking. Always check that the internal temperature reaches 165 degrees.
Can I cook frozen chicken at 400 degrees in the air fryer?
Yes, you can cook frozen chicken at this temperature. Add about 5 to 10 minutes to the standard cooking time. Just ensure the meat reaches a safe internal temperature before eating.
Do I need to preheat the air fryer for chicken?
Preheating is recommended for better crispiness. It takes about 3 minutes at 400 degrees. This helps the cooking process start immediately for a better sear.
Why is my air fryer chicken dry?
Dry chicken usually means it was overcooked or overcrowded. Cook for less time and check the temperature early. Also, make sure not to stack pieces too close together.
Should I flip the chicken during cooking?
Yes, flipping is important for even browning. Turn the chicken halfway through the cooking time. This ensures both sides get crispy and cooked properly.
What temperature should chicken be cooked to?
Chicken must reach an internal temperature of 165 degrees Fahrenheit. Use a meat thermometer to check the thickest part. This ensures the meat is safe to eat.



