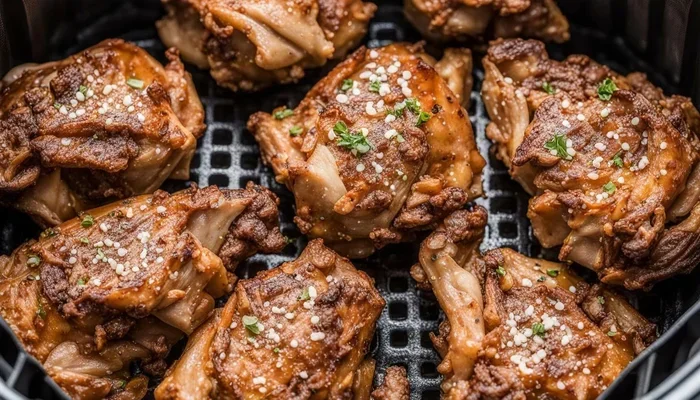
Cooking chicken livers in an air fryer is a fast, healthy way to enjoy this nutrient-rich organ meat without heavy oil or mess. With the right prep, you get tender, flavorful bites in under twenty minutes. This guide shows you simple seasoning ideas, safe cooking temps, and easy tricks to avoid dryness. You will learn how to make a quick weeknight meal that tastes great and feels light.
If you have ever wondered how to cook chicken livers in an air fryer, you are in good company. Many people skip organ meats because they think the prep is hard or the taste is too strong. The good news is that chicken livers can be mild, rich, and very easy to make when you handle them the right way. An air fryer makes the job even simpler because it gives you crisp edges and a tender center without a lot of oil.
This method is great for busy nights, small portions, and anyone who wants a protein-packed meal with less fuss. You do not need a skillet, a deep pan, or a long cleanup. With a few basic spices and a little care, you can turn a simple ingredient into something warm, satisfying, and full of flavor. In this guide, we will walk through the whole process so you can make chicken livers with confidence.
Key Takeaways
- Fast cooking time: Chicken livers cook quickly in an air fryer, often in 12 to 18 minutes at moderate heat.
- Simple prep matters: Rinse, pat dry, and trim any tough spots before seasoning for the best texture.
- Moderate heat works best: Cooking around 350 to 375 degrees helps keep livers tender instead of rubbery.
- Seasoning adds flavor: Light spices like garlic powder, paprika, pepper, and herbs lift the natural taste without heaviness.
- Safe internal temp: Cook until the livers reach a safe temperature and look firm but still moist inside.
- Don’t overcrowd the basket: Giving pieces space helps hot air circulate for even browning.
- Great with sides: Serve with toast, greens, rice, or roasted veggies for a balanced, satisfying meal.
📑 Table of Contents
- Why Chicken Livers Work Well In An Air Fryer
- How To Prepare Chicken Livers Before Cooking
- How To Cook Chicken Livers In An Air Fryer Step By Step
- Seasoning Ideas For Chicken Livers In An Air Fryer
- Food Safety And Doneness For Chicken Livers
- Serving Ideas And Side Dishes
- How To Store And Reheat Leftover Chicken Livers
- Final Thoughts On Cooking Chicken Livers In An Air Fryer
Why Chicken Livers Work Well In An Air Fryer
Chicken livers are small, tender, and cook faster than many other cuts of meat. That makes them a natural fit for an air fryer, which uses rapid hot air to brown food quickly. Since livers do not need long cooking, they stay soft when you watch the time closely. They also take well to simple seasonings, so you can keep the flavor clean and light or make it bold if you prefer.
A Quick Look At The Texture And Flavor
Chicken livers have a soft, creamy texture when cooked properly. Their flavor is earthy but not overpowering, especially once you season them well. If you like rich food without heavy sauces, this is a nice option. The air fryer adds a little crunch on the outside, which gives each bite a pleasant contrast.
Why Air Frying Can Be Easier Than Pan-Frying
Pan-frying can work well, but it often needs more oil and more attention. The air fryer reduces splatter and makes it easier to cook small portions evenly. It also helps when you want a quick dinner because you can set the time and check the livers near the end. If you enjoy simple cooking methods, this is a practical choice.
How To Prepare Chicken Livers Before Cooking
Good results start before the livers go into the basket. A little prep helps the seasoning stick and keeps the texture pleasant. You do not need complicated steps, just a few careful ones.
Cleaning And Trimming
Start by rinsing the livers under cool water and patting them dry with paper towels. Remove any hard spots, loose membranes, or bits that look unappealing. Some people also like to soak the livers briefly in milk or water if they want a milder taste. That step is optional, but it can help if you are sensitive to strong flavors.
Drying And Seasoning Basics
Moisture is the enemy of browning, so make sure the livers are as dry as possible before seasoning. A light coat of oil can help spices adhere and improve the crisp finish. Keep the seasoning simple at first. Salt, black pepper, garlic powder, and paprika make a strong starting point. From there, you can add herbs, heat, or a touch of sweetness depending on your taste.
Quick Tips For Better Prep
- Handle the livers gently so they do not break apart.
- Use a light hand with salt if you plan to serve them with salty sides.
- Try a small spice test with one or two pieces before seasoning the whole batch.
- If the livers are very large, consider cutting them for more even cooking.
How To Cook Chicken Livers In An Air Fryer Step By Step
Once the livers are prepped, the cooking process is straightforward. The main goal is to brown the outside while keeping the inside tender. The exact time can vary a bit based on size and your air fryer model, so it helps to check them near the end.
Setting The Temperature And Time
A moderate temperature usually works best. If the heat is too high, the outside can brown too fast while the inside stays underdone. If the heat is too low, the livers may dry out before they develop any color. Many cooks start around 350 to 375 degrees and adjust based on their preference. A common range for total cooking time is about 12 to 18 minutes, with a flip or shake partway through.
Arranging The Basket For Even Cooking
Place the livers in a single layer if possible. Overcrowding can trap steam and reduce browning. If you need to cook in batches, that is fine. It is better to give each piece room than to pack the basket tightly. Halfway through cooking, turn the livers or shake the basket so they cook more evenly.
Checking For Doneness
Chicken livers should be cooked through, but they do not need to become dry or crumbly. Look for a firm exterior and a center that is no longer raw. If you are unsure, cut one piece open to check. The color should be uniform, and the texture should feel done without turning tough.
Common Mistakes To Avoid
- Cooking at too high a temperature and drying out the livers
- Packing too many pieces into the basket at once
- Forgetting to pat the livers dry before seasoning
- Overcooking until they become chalky
- Skipping the halfway turn or shake
Seasoning Ideas For Chicken Livers In An Air Fryer
One of the best parts of making how to cook chicken livers in an air fryer is how flexible the seasoning can be. You can keep things simple or build a stronger flavor profile. Since chicken livers have a naturally rich taste, they pair well with both savory and slightly spicy seasonings.
Simple Salt And Pepper Style
This is the easiest route and a good place to start. Use salt, black pepper, a little garlic powder, and a touch of paprika if you want color. A small amount of onion powder can also work nicely. This style is clean, classic, and easy to pair with many sides.
Spicy And Smoky Options
If you like heat, add cayenne, chili powder, or a smoky seasoning blend. Smoked paprika can give a deeper flavor without much effort. A little pepper sauce or hot sauce in the seasoning mix can also add brightness. Start small, because spicy blends can build quickly.
Herb Forward Seasoning
Fresh or dried herbs can soften the earthy notes and make the livers taste brighter. Thyme, rosemary, parsley, and oregano all work well. Dried herbs are convenient in the air fryer because they stick to the oil coating more easily. If you use fresh herbs, add the delicate ones after cooking for a fresher finish.
Light Glaze Or Finish
Some cooks like a final drizzle after cooking. A little butter, lemon juice, or a mild sauce can round out the flavor. You can also sprinkle a bit of extra salt or herbs at the end. Keep the finish light so the livers still stay the main focus.
Food Safety And Doneness For Chicken Livers
Because chicken livers are organ meat, it is smart to handle them with care. Clean hands, clean tools, and proper cooking all matter. The goal is to make them safe while still keeping them tender enough to enjoy.
Safe Handling In The Kitchen
Keep the livers cold until you are ready to cook them. Wash your hands before and after touching raw poultry. Use a separate cutting board if you prepare other foods at the same time. Wipe down surfaces and utensils after use. These simple habits help reduce cross-contamination.
How To Tell When They Are Done
The best check is a combination of color, texture, and time. The livers should look cooked through and feel firm, not soft or raw. If you cut one open, the inside should be uniform. Avoid serving them if they still seem underdone. At the same time, do not push them too far past done, or they may lose their tenderness.
Expert Insights
- Use a moderate temperature so the outside and inside finish more evenly.
- Check the livers a few minutes before the expected end time.
- If your pieces vary in size, the smaller ones may finish sooner.
- Let the livers rest briefly after cooking so the juices settle.
Serving Ideas And Side Dishes
Chicken livers can stand alone, but they also shine when paired with the right sides. Since they are rich and savory, they work well with both simple and flavorful accompaniments. You can build a full plate without much extra effort.
Easy Sides To Pair With Livers
Toast or crusty bread is a classic choice. It gives you a crisp base for the tender livers and any juices they release. A side of greens adds freshness and balance. Roasted vegetables also work nicely because their natural sweetness can complement the savory flavor. If you want something heartier, rice, potatoes, or grains can round out the meal.
Breakfast, Lunch, Or Dinner
Chicken livers are flexible enough for different times of day. For breakfast, serve them with toast and eggs. For lunch, pair them with a salad or sandwich fixings. For dinner, add roasted veggies or a grain bowl for a fuller plate. The meal can be light or substantial depending on what you serve with them.
Flavor Pairings That Work Well
Here are a few combinations that tend to taste great:
- Garlic, lemon, and parsley for a bright finish
- Smoked paprika and onion for a deeper savory taste
- Pepper, herbs, and a little butter for richness
- Mild spice and toast for a simple comfort meal
- Greens and grains for a more balanced plate
How To Store And Reheat Leftover Chicken Livers
If you have leftovers, store them promptly in a sealed container in the fridge. They are best enjoyed soon after cooking, but proper storage can help them stay safe and tasty for a short time. Reheating should be gentle so the livers do not dry out.
Refrigerating Leftovers
Let the livers cool to room temperature before storing them, but do not leave them out too long. Place them in an airtight container and keep them chilled. Try to use them within a short window for the best texture and flavor.
Gentle Reheating In The Air Fryer
The air fryer can work well for reheating because it warms food without much added oil. Use a lower temperature and a short time, just enough to warm the livers through. Check them often so they do not overcook. If they seem dry, a tiny bit of moisture or a light coating of oil can help.
Key Takeaways
- Prep matters: Dry and trim the livers before seasoning.
- Moderate heat is best: A steady medium temperature helps keep them tender.
- Give them space: Avoid overcrowding the basket for better browning.
- Check doneness early: Look for a firm, cooked texture without overdoing it.
- Season simply first: Start with salt, pepper, garlic, and paprika.
- Serve with balance: Pair with bread, greens, rice, or roasted veggies.
- Reheat gently: Warm leftovers carefully to avoid dryness.
Final Thoughts On Cooking Chicken Livers In An Air Fryer
Learning how to cook chicken livers in an air fryer is a useful skill because it turns a simple ingredient into a quick, tasty meal. The process is short, the cleanup is easier than many stovetop methods, and the results can be surprisingly tender when you handle them with care. If you start with good prep, moderate heat, and a seasoning you enjoy, you will have a reliable recipe for busy days.
The best part is that you can adjust the flavor to suit your taste. Keep it simple, make it spicy, or add herbs for a fresher note. You can also change the sides to fit breakfast, lunch, or dinner. Once you get comfortable with the timing and texture, chicken livers become an easy option instead of a intimidating one.
If you want a small, protein-rich meal that feels satisfying without being heavy, this method is worth trying. Start with a small batch, taste as you go, and make small adjustments next time. That approach makes it easy to build a version you truly enjoy.
Frequently Asked Questions
How long should I cook chicken livers in an air fryer?
Cooking time usually falls between 12 and 18 minutes, depending on size and your air fryer model. Check them near the end so they stay tender and do not dry out.
What temperature is best for chicken livers in an air fryer?
A moderate temperature around 350 to 375 degrees generally works well. This helps the livers brown without cooking too aggressively on the outside.
Do I need to soak chicken livers before cooking?
Soaking is optional, but some people do it to mellow the flavor. If you choose to soak them, rinse and dry the livers well before seasoning and cooking.
Can I season chicken livers before air frying?
Yes, seasoning before cooking is a good idea. A light coat of oil can help salt, pepper, garlic powder, paprika, or herbs stick to the livers.
How do I know when chicken livers are done?
They should look cooked through and feel firm, with no raw center. If needed, cut one piece open to check that the color is uniform and the texture is done.
What sides go well with air-fried chicken livers?
Toast, greens, rice, potatoes, and roasted vegetables all pair nicely. You can keep the meal simple or make it more filling with a hearty side.