
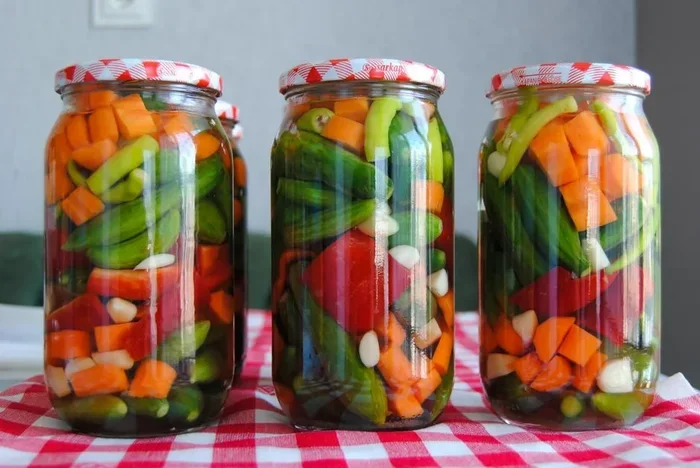
Making pickled peppers at home is easier than you think, and this pickled peppers recipe walks you through every step with confidence. You will learn how to choose the right peppers, prepare a simple brine, and achieve that perfect tangy crunch every single time. Whether you are a complete beginner or just looking to improve your canning skills, this guide has everything you need.
Pickled peppers are one of the simplest and most rewarding preserves you can make at home. There is something deeply satisfying about taking fresh peppers from your garden or the farmers market and transforming them into a tangy, crunchy staple that lasts for months. The pickled peppers recipe we are sharing today is designed with beginners in mind, so you do not need any prior canning experience to succeed.
If you have ever bought a jar of pickled peppers from the store and thought they tasted nothing like what you imagined, this is your chance to take control. Homemade pickled peppers let you choose the pepper variety, adjust the spice level, and decide exactly what goes into your brine. The result is a product that is fresher, tastier, and far more customizable than anything on a grocery shelf.
Beyond flavor, pickling peppers is a practical way to preserve your harvest. When your pepper plants are producing more than you can eat fresh, pickling gives you a delicious way to enjoy them year-round. It is also a great entry point into the world of home canning, which opens the door to preserving many other fruits and vegetables.
Key Takeaways
- Simple Ingredients: You only need peppers, vinegar, water, salt, and sugar to make great pickled peppers at home.
- Easy to Customize: Adjust the spice level, add garlic or dill, and make the recipe your own.
- Two Storage Methods: You can store pickled peppers in the fridge for quick enjoyment or can them for long-term shelf life.
- Beginner-Friendly: No special equipment or advanced skills are required to get started.
- Versatile Use: Pickled peppers pair well with sandwiches, salads, pizzas, and many other dishes.
- Long Shelf Life: Properly canned pickled peppers can last up to a year in your pantry.
📑 Table of Contents
- Why Pickled Peppers Belong in Every Kitchen
- Gathering Your Ingredients for the Perfect Pickled Peppers
- Step-by-Step Pickled Peppers Recipe
- Tips for the Best Flavor and Texture
- How to Store and Enjoy Your Pickled Peppers
- Common Mistakes to Avoid When Pickling Peppers
- Expert Insights on Pickling Peppers
- Conclusion
Why Pickled Peppers Belong in Every Kitchen
Pickled peppers bring a bright, tangy punch to meals that few other ingredients can match. They add crunch, heat, and acidity in a single bite, making them a versatile condiment for countless dishes. Once you start making them at home, you will wonder why you ever relied on store-bought versions.
A World of Flavor at Your Fingertips
The beauty of a homemade pickled peppers recipe is the control it gives you. You decide how hot or mild you want the final product. You choose the vinegar type, the spice blend, and the sweetness level. Want a subtle, slightly sweet pepper relish? Go for it. Prefer fiery habanero slices in a spicy brine? That works too.
This level of customization is something store-bought jars simply cannot offer. When you make pickled peppers at home, every batch can be a new experiment. You can mix different pepper varieties, add fresh herbs like dill or basil, or throw in spices like mustard seed and coriander for unexpected flavor dimensions. The possibilities are truly endless when you are the one in charge of the kitchen.
Preserving Your Harvest the Easy Way
If you grow peppers, you know the struggle of having more peppers than you can possibly eat fresh. Pickling is one of the oldest and most effective preservation methods. It extends the shelf life of your peppers significantly while actually enhancing their flavor.
For those who also enjoy drying peppers, there are other great methods to explore. If you want to learn how to dry peppers in an oven for a different kind of preserved pepper snack, there are plenty of guides available that walk you through the process step by step. Similarly, you can check out how to dry peppers in an air fryer if you prefer a faster, more energy-efficient approach. Both drying and pickling are excellent ways to make the most of a bountiful pepper harvest.
Gathering Your Ingredients for the Perfect Pickled Peppers
Before you start, it helps to have everything ready. The ingredient list for a basic pickled peppers recipe is refreshingly short, which is part of what makes this project so beginner-friendly. You do not need to run to a specialty store for obscure ingredients. A quick trip to your kitchen pantry and the produce aisle is all it takes.
Core Ingredients
Here is what you will need for a standard batch of homemade pickled peppers:
- Fresh peppers: Use whatever variety you like. Jalapeños, banana peppers, bell peppers, and cherry peppers all work wonderfully for this pickled peppers recipe.
- White vinegar or apple cider vinegar: Vinegar is the backbone of any pickle brine. Apple cider vinegar adds a slightly mellow flavor, while white vinegar keeps things clean and sharp.
- Water: Plain water dilutes the vinegar to the right acidity level for safe pickling and balanced flavor.
- Pickling salt or kosher salt: Regular table salt contains anti-caking agents that can cloud your brine. Pickling salt dissolves cleanly and keeps your liquid crystal clear.
- Sugar: A small amount balances the acidity and rounds out the flavor profile of your finished pickles.
Flavor Boosters and Add-Ins
While the core ingredients are simple, the add-ins are where you can really get creative. Here are some popular options to elevate your homemade pickled peppers:
- Garlic cloves: Whole peeled garlic cloves add a deep, savory warmth to every bite of your pickled peppers.
- Dill seeds or fresh dill: Classic for a more traditional pickle flavor profile that pairs well with milder peppers.
- Mustard seeds: Yellow or brown mustard seeds bring a gentle nuttiness and a subtle hint of heat.
- Black peppercorns: These add a subtle woody warmth that complements the vinegar beautifully.
- Red pepper flakes: If you want extra heat, a pinch of red pepper flakes goes a long way in the brine.
- Bay leaves: One or two bay leaves per jar add an earthy depth that ties all the flavors together.
You do not need to use all of these at once. Start with two or three add-ins and build from there as you develop your personal preference. Over time, you will find your own perfect combination.
Step-by-Step Pickled Peppers Recipe
Now comes the fun part. This pickled peppers recipe is straightforward and forgiving, so even if you have never pickled anything before, you will find this process manageable and enjoyable. Follow along and you will have a jar of delicious homemade pickles in no time.
Step 1: Prepare Your Peppers
Start by washing your peppers thoroughly under cool running water. Pat them dry with a clean towel. Next, decide on your cut style. You can slice them into rings, leave small peppers whole, or cut larger peppers into strips.
For whole peppers, use a toothpick or a paring knife to poke a few small holes in each one. This allows the brine to penetrate the pepper more evenly and ensures consistent flavor throughout every piece.
If you are working with hot peppers, wearing gloves is a smart move. Capsaicin, the compound that makes peppers hot, can irritate your skin and eyes. Do not learn this lesson the hard way. Trust me on this one.
Step 2: Pack the Jars
Place your prepared peppers tightly into clean, sterilized canning jars. Pack them snugly but not so tight that you cannot pour brine over them. Leave about half an inch of headspace at the top of each jar.
Add your chosen flavor boosters directly into the jars at this stage. A few garlic cloves, a teaspoon of mustard seeds, and a sprig of fresh dill work beautifully together. The peppers will absorb these flavors as they sit in the brine, creating a deeply seasoned result.
Step 3: Make the Brine
In a saucepan, combine one cup of vinegar with one cup of water. Add one tablespoon of pickling salt and one tablespoon of sugar. Bring the mixture to a boil, stirring until the salt and sugar are fully dissolved.
Once the brine reaches a rolling boil, remove it from the heat immediately. Pour the hot brine over the peppers in your jars, making sure the peppers are completely submerged. Leave a quarter inch of headspace to allow for proper sealing during the canning process.
Step 4: Seal and Process
Wipe the rims of your jars with a clean, damp cloth to remove any drips. This small step is important for getting a proper seal. Place the lids and rings on finger-tight. For refrigerator pickles, simply let the jars cool and store them in the fridge. For shelf-stable pickles, process the sealed jars in a boiling water bath for about 10 minutes.
Once processed, remove the jars and let them cool on a towel-lined surface. You should hear a satisfying popping sound as the lids seal. Check each lid after 24 hours to make sure it is firm and does not flex when pressed. A solid seal means your pickled peppers are ready for long-term storage.
Tips for the Best Flavor and Texture
Making great pickled peppers is about the details. A few small tweaks can elevate your results from good to outstanding. Keep these tips in mind as you work through your first batch.
Choose the Right Peppers
Freshness matters enormously in pickling. Look for peppers that are firm, glossy, and free of soft spots or blemishes. The younger and fresher the pepper, the crunchier your final pickle will be. Avoid peppers that look wrinkled or dull, as they will produce a softer texture that is less enjoyable.
If you are growing your own, pick peppers in the morning when they are fully hydrated. Handle them gently to avoid bruising, which can lead to soft or mushy pickles. The quality of your starting ingredients directly impacts the quality of your finished product.
Get the Vinegar-to-Water Ratio Right
The standard ratio for a safe pickle brine is one part vinegar to one part water. This ensures the acidity level is high enough to prevent harmful bacteria from growing. Do not skimp on the vinegar or try to dilute the brine beyond this ratio, especially if you are canning for long-term storage.
If you prefer a milder flavor, you can use more water, but always keep the vinegar at no less than 50 percent of the total liquid. For a stronger, more tangy pickle, increase the vinegar ratio slightly. Finding your preferred balance is part of the fun of making homemade pickled peppers.
Be Patient
One of the most common mistakes beginners make is opening the jars too soon. Pickled peppers need time to develop their full flavor. For refrigerator pickles, wait at least three to five days before enjoying them. For canned pickles, let them sit for at least two to three weeks. The flavors will deepen and meld beautifully over time.
Resist the temptation to peek. Trust the process, and your patience will be rewarded with peppers that taste vibrant, complex, and perfectly balanced. Good things come to those who wait, and homemade pickled peppers are no exception.
Quick Tips for Success
- Always use clean jars: Sterilize your jars by boiling them in water for 10 minutes before filling them with peppers and brine.
- Use fresh brine each time: Do not reuse old brine from a previous batch, as it can affect both safety and flavor.
- Label your jars: Note the date and pepper variety so you can track how each batch turns out over time.
- Store in a cool, dark place: Canned pickles last longest when kept away from direct sunlight and heat sources.
- Taste as you go: After a week, try a pepper from one jar to check the flavor and adjust your next batch accordingly.
How to Store and Enjoy Your Pickled Peppers
Proper storage is the final piece of the puzzle. Getting this right ensures your pickled peppers stay safe, crunchy, and delicious for as long as possible. A little attention to storage goes a long way toward preserving all your hard work.
Refrigerator Pickles
Refrigerator pickles are the quickest and easiest method. Once your jars have cooled, simply place them in the refrigerator. These pickles are not shelf-stable and must be kept cold at all times. They are best enjoyed within two to three months, though they can last up to six months in a well-maintained fridge.
Refrigerator pickles are ideal for beginners because they skip the canning process entirely. You can start eating them within days, making them perfect for weekend projects or when you want a quick homemade treat without any special equipment.
Canned Pickles for Long-Term Storage
Canned pickled peppers can last up to 12 months when stored properly. Keep them in a cool, dark pantry or cellar. Always inspect jars before opening. Discard any jars with bulging lids, rust, or an off smell, as these are signs of spoilage.
Once opened, canned pickles should be refrigerated and consumed within a few weeks, just like any other opened jar of preserves. Proper storage habits keep your homemade pickled peppers safe and delicious for months on end.
Delicious Ways to Use Your Pickled Peppers
Pickled peppers are incredibly versatile. Here are some ideas to get you started:
- Sandwiches and wraps: Slice them and add them to burgers, subs, or wraps for a tangy crunch that elevates any meal.
- Pizza topping: They pair wonderfully with cheese, sausage, and fresh basil on homemade pizza for a bright, acidic contrast.
- Salads: Chopped pickled peppers brighten up pasta salads and grain bowls. They are a great addition to a bacon ranch pasta salad recipe for bbqs, adding a nice kick and tangy flavor.
- Charcuterie boards: Arrange them alongside cured meats, cheeses, and crackers for an impressive appetizer spread.
- Tacos and burritos: Pickled peppers are a natural fit for Mexican-inspired dishes, adding brightness and heat in every bite.
Common Mistakes to Avoid When Pickling Peppers
Even with a simple recipe, a few missteps can ruin your batch. Here are the most common mistakes beginners make and how to avoid them. Learning from these pitfalls will save you time, ingredients, and frustration.
Using the Wrong Type of Salt
Table salt contains iodine and anti-caking agents that can discolor your brine and affect the flavor of your pickled peppers. Always use pickling salt, kosher salt, or sea salt without additives. These dissolve cleanly and keep your brine looking professional and clear.
Skipping the Sterilization Step
Some beginners skip sterilizing their jars to save time. This is a risky shortcut. Unsterilized jars can harbor bacteria, mold, or yeast that will spoil your pickles and potentially make them unsafe to eat. Always take the extra few minutes to sterilize your equipment properly. Your safety is worth the effort.
Overpacking the Jars
It is tempting to cram as many peppers as possible into each jar, but overpacking prevents the brine from circulating properly. This can lead to uneven flavor and texture throughout the jar. Pack the peppers firmly but leave enough room for the brine to flow freely around each piece for consistent results.
Using Low-Quality Vinegar
The vinegar is the most critical ingredient for food safety in pickling. Always use vinegar with at least 5 percent acidity. Do not dilute it with water beyond the recommended ratio, and never substitute wine vinegar or rice vinegar unless the recipe specifically calls for it, as their acidity levels may differ and compromise safety.
Expert Insights on Pickling Peppers
Start Small and Build Confidence
The best approach for any beginner is to start with a small batch. Make a single jar of pickled peppers using this pickled peppers recipe, and use it as a learning experience. Pay attention to how the flavors develop, note what you liked and what you would change, and refine your process with each new batch.
Once you are comfortable with the basic method, you can start experimenting with different pepper varieties, brine ratios, and flavor add-ins. Before long, you will be creating your own signature pickled pepper recipes that reflect your personal taste and style.
The Science Behind the Crunch
The crunch in a great pickled pepper comes from the pepper’s cell structure holding up against the acidic brine. Very fresh, firm peppers retain their crunch best. Soaking peppers in ice water for 30 minutes before packing them into jars can help maintain that satisfying snap.
Some experienced picklers also add a grape leaf or a small amount of alum to the jar. These natural ingredients contain tannins that help keep the peppers firm and crispy throughout the preservation process. These little tricks can make a big difference in the final texture of your pickled peppers.
Safety First
Pickling is a safe and well-tested preservation method when done correctly. The key is maintaining the proper acid balance in your brine. The vinegar-to-water ratio of one-to-one ensures that the pH stays low enough to prevent the growth of dangerous bacteria, including botulism.
Never alter the vinegar ratio without understanding the food safety implications. If you want to experiment with different flavors, do so within the safe framework of the basic brine recipe. When in doubt, stick to the tested ratios and enjoy peace of mind with every jar.
Conclusion
The pickled peppers recipe shared in this guide is your gateway to making delicious, homemade pickled peppers with confidence. From choosing the freshest peppers to crafting the perfect brine, every step is designed to be simple and enjoyable for beginners. You do not need fancy equipment or years of experience to create jars of tangy, crunchy pickled peppers that rival anything from the store.
Pickled peppers are more than just a condiment. They are a celebration of flavor, a practical way to preserve your harvest, and a rewarding project that fills your kitchen with wonderful aromas. Once you make your first batch, you will understand why this tradition has been passed down through generations of home cooks and gardeners.
So grab some fresh peppers, gather your ingredients, and give it a try. Your taste buds will thank you, and you will have a jar of homemade goodness ready to enjoy in just a few days. The pickled peppers recipe is waiting, and it is easier than you think. Start your first batch today and discover the joy of homemade pickling.
Frequently Asked Questions
Can I use any type of pepper for this pickled peppers recipe?
Yes, you can use virtually any pepper variety. Jalapeños, banana peppers, bell peppers, cherry peppers, and even hot peppers like habaneros or serranos all work well. The key is to choose fresh, firm peppers for the best texture and flavor results in your homemade pickled peppers.
How long do homemade pickled peppers last?
Refrigerator pickles stay fresh for two to three months, while properly canned pickled peppers can last up to 12 months in a cool, dark pantry. Always check jars for signs of spoilage like bulging lids or off smells before consuming your homemade pickled peppers.
Do I need special equipment to make pickled peppers?
No, you do not need any special equipment beyond basic canning jars, lids, and a saucepan. A boiling water bath canner is helpful for shelf-stable pickles but is not required for refrigerator pickles, which are the easiest option for beginners just getting started.
Can I reduce the vinegar in the brine for a milder taste?
You can adjust the vinegar-to-water ratio slightly for a milder flavor, but never go below 50 percent vinegar. Maintaining proper acidity is essential for food safety, especially if you plan to store the homemade pickled peppers at room temperature for long-term preservation.
Why are my pickled peppers soft instead of crunchy?
Soft pickled peppers usually result from using overripe or bruised peppers, skipping the sterilization step, or storing them in warm conditions. Always choose firm, fresh peppers and store your finished homemade pickled peppers in a cool, dark place for the best crunch and texture.
Can I reuse the brine from a previous batch of pickled peppers?
It is best to always use fresh brine for each new batch. Reusing old brine can dilute the acidity level, which may compromise food safety and flavor. Fresh brine ensures consistent results and a safe preservation environment every time you make a new batch of pickled peppers.



