
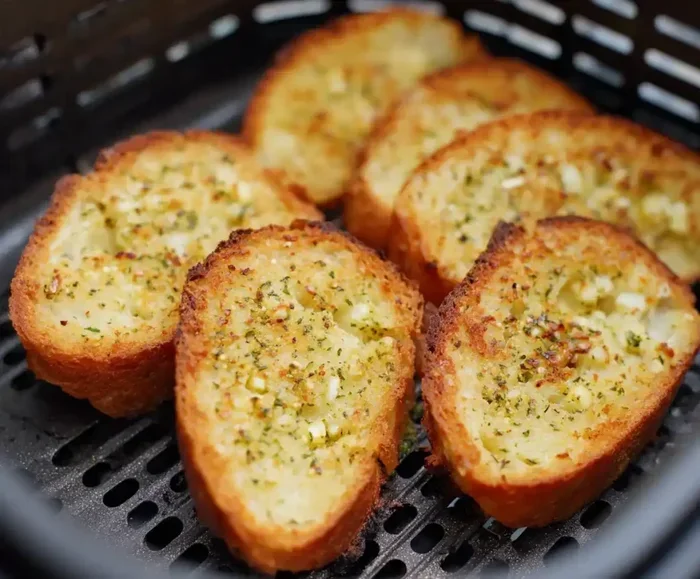
Wondering how long can you cook garlic bread in the air fryer? The sweet spot is usually 5 to 8 minutes at 350°F for fresh bread. Frozen garlic bread needs about 10 to 12 minutes to heat through properly. Always check halfway to avoid burning the butter and garlic.
There is nothing quite like the smell of warm garlic bread filling the kitchen. It is a comfort food that pairs perfectly with pasta, soup, or just a simple salad. But sometimes you do not have the time to preheat a full-sized oven. That is where the air fryer comes in handy. Many people ask how long can you cook garlic bread in the air fryer without drying it out or burning it.
Using an air fryer is a fantastic way to get that crispy exterior while keeping the inside soft and buttery. It heats up faster than a conventional oven. This means you can satisfy those carb cravings in minutes. However, timing is everything. Too little time and it is soggy. Too much time and the garlic turns bitter.
In this guide, we will walk you through everything you need to know. We will cover fresh bread, frozen options, and even homemade recipes. You will learn the best temperatures and tricks to avoid common mistakes. By the end, you will be making perfect garlic bread every single time.
Key Takeaways
- Optimal Time: Fresh garlic bread cooks in 5-8 minutes at 350°F.
- Frozen Options: Frozen garlic bread requires 10-12 minutes for best results.
- Temperature Matters: Higher heat burns garlic quickly; stick to medium settings.
- Preparation Tips: Butter and season evenly before placing in the basket.
- Avoid Overcrowding: Cook in a single layer for even crispiness.
- Check Frequently: Air fryers vary, so monitor the last minute closely.
- Serving Suggestion: Let it rest for a minute before slicing and serving.
📑 Table of Contents
Why Use an Air Fryer for Garlic Bread
You might wonder why you should bother using an air fryer instead of a toaster or oven. The answer lies in efficiency and texture. Air fryers circulate hot air rapidly around the food. This creates a convection effect that crisps up the bread quickly.
When you make air fryer garlic bread, you often get a better crunch than a toaster. A toaster might burn the edges before the butter melts. An oven takes too long to preheat for just a few slices. The air fryer strikes the perfect balance between speed and quality.
It is also energy efficient. You do not need to heat up a large appliance for a small snack. This makes it ideal for weeknight dinners or quick appetizers. Plus, cleanup is usually easier since most baskets are non-stick.
Comparing Cooking Methods
Different methods yield different results. Here is a quick look at how the air fryer stacks up against other options.
Toaster: Fast but uneven. Hard to add butter before toasting.
Conventional Oven: Great for large batches. Takes 10-15 minutes to preheat.
Air Fryer: Fast preheat. Crispy results. Perfect for 1-4 servings.
If you are cooking for just yourself or a few people, the air fryer is the winner. It gives you control over the cooking time without wasting energy.
How Long Can You Cook Garlic Bread In The Air Fryer
This is the big question. The exact time depends on the type of bread you use. It also depends on whether it is fresh or frozen. Generally, you want to cook at a moderate temperature. High heat burns the garlic powder quickly.
For fresh garlic bread, start with 350°F. Cook it for about 5 to 8 minutes. Check it at the 4-minute mark. If the edges are golden brown, it is likely done. Remember that the bread continues to cook slightly after you take it out.
For frozen garlic bread, you need more time. The center needs to thaw and heat up. Aim for 10 to 12 minutes at the same temperature. Some people prefer 375°F for frozen slices to get a crispier crust. Just keep an eye on it during the last few minutes.
Fresh vs. Frozen Timing
Understanding the difference in timing is crucial. Fresh bread is already soft. It just needs heating and crisping. Frozen bread is hard and cold. It needs thorough heating.
Here is a simple breakdown:
Fresh Slices: 5-8 minutes at 350°F.
Frozen Slices: 10-12 minutes at 350°F to 375°F.
Homemade Loaf: 8-10 minutes depending on thickness.
Always adjust based on your specific machine. Some air fryers run hotter than others. It is better to check early than to ruin the batch.
Best Temperature Settings for Crispy Results
Temperature plays a huge role in the final texture. If you go too high, the outside burns before the inside warms. If you go too low, the bread gets dry and chewy. The sweet spot is usually between 350°F and 375°F.
At 350°F, the butter melts gently. The garlic infuses the bread without scorching. This is the safest bet for most types of bread. It ensures the crispy garlic bread texture is achieved evenly.
If you like a harder crunch, you can bump it to 375°F. But reduce the time by a minute or two. This higher heat works well for thicker slices. It helps create a sturdy exterior that holds the butter.
Adjusting for Bread Thickness
Not all bread slices are the same. Thin sandwich bread cooks faster. Thick artisan slices take longer. You need to adjust your air fryer cooking time based on this.
For thin slices, stick to the lower end of the time range. For thick slices, add a minute or two. If you are making homemade garlic bread from a baguette, cut the pieces evenly. This ensures they all finish cooking at the same time.
Uneven slices lead to uneven cooking. Some pieces will be burnt while others are cold. Take a moment to slice uniformly before adding butter.
Preparing Your Garlic Butter Mixture
The flavor comes from the mixture you spread on the bread. You can use store-bought butter or make your own. Making your own allows you to control the sodium and garlic intensity. Softened butter is easier to spread evenly.
Mix melted butter with minced garlic or garlic powder. Fresh garlic offers a stronger punch. Powder provides a more consistent flavor distribution. Add some parsley for color and freshness. A pinch of salt enhances the taste.
Spread the mixture on one side of the bread. Do not soak it completely. You want a generous layer, but not dripping. Excess butter can smoke in the air fryer basket. This creates a mess and affects the flavor.
Ingredients for Perfect Flavor
To make the best garlic bread recipe, keep these ingredients in mind:
Butter: Unsalted is best so you can control salt levels.
Garlic: Fresh minced or high-quality powder.
Parsley: Fresh chopped adds a nice green contrast.
Cheese: Optional sprinkle of mozzarella or parmesan.
Adding cheese changes the cooking time slightly. Cheese melts quickly. You might need to cover it with foil if it browns too fast. But for standard garlic bread, keep it simple.
Common Mistakes to Avoid
Even simple tasks can go wrong if you are not careful. One common mistake is overcrowding the basket. Air needs to flow around each slice. If they are stacked, they will steam instead of crisp.
Another mistake is using too much heat. Garlic burns easily. Burnt garlic tastes bitter and unpleasant. Always start with lower heat and increase only if needed. This is key to knowing how long can you cook garlic bread in the air fryer safely.
Forgetting to check halfway is also risky. Air fryers vary in power. What works for one brand might burn another. Open the basket once during cooking to check the color. Rotate the slices if needed for even browning.
Tips for Even Cooking
To ensure every slice is perfect, follow these quick tips:
Single Layer: Never stack the bread.
Shake or Flip: Turn slices halfway through.
Watch the Edges: They brown faster than the center.
Use Parchment: Prevents sticking and catches drips.
Using parchment paper designed for air fryers is a good idea. It makes cleanup easier. Just make sure it does not block the air flow. Cut it to fit the bottom of the basket.
Serving and Storage Suggestions
Once your bread is ready, let it cool for a minute. This helps the butter set slightly. It makes slicing easier and prevents burns. Serve it warm for the best experience.
Garlic bread pairs well with many dishes. It is classic with spaghetti and meatballs. It also works great with soups or stews. You can even use it as a side for grilled meats.
If you have leftovers, store them properly. Keep them in an airtight container at room temperature for a day. For longer storage, freeze them. You can reheat them in the air fryer again. Just add a minute or two to the cooking time.
Reheating Leftovers
Do not use a microwave. It makes the bread rubbery. The air fryer is the best way to revive leftovers. Set it to 350°F and heat for 3-4 minutes. This restores the crispiness without drying it out.
You can also use this method for other frozen items. If you are curious about other foods, you might like learning how to cook frozen fish in air fryer. It is another quick meal option for busy nights.
Expert Insights on Air Frying Bread
Experienced cooks suggest preheating the air fryer. A hot basket starts the crisping process immediately. This reduces the overall air fryer cooking time. It also helps prevent the bread from sticking.
Another insight is to use silicone molds for certain shapes. If you are making stuffed bread, molds help hold the shape. You can read more about this in our guide on how do you use silicone mould in the oven. It offers great tips for baking tools.
Experiment with flavors too. Add a little chili flakes for heat. Try different herbs like oregano or basil. The air fryer is versatile. Once you master the timing, you can try many variations.
Final Thoughts on Timing
Getting the timing right takes a little practice. But once you know your machine, it becomes second nature. Start with the recommended times and adjust from there. Remember that visual cues are just as important as the timer.
Golden brown edges and a melted butter surface are your signs. The smell of toasted garlic is another indicator. Trust your senses along with the clock. This ensures you get the best crispy garlic bread every time.
Enjoy your delicious creation while it is hot. There is nothing better than pulling a perfect batch out of the basket. Now you know exactly how long can you cook garlic bread in the air fryer for optimal results.
Frequently Asked Questions
Can I use aluminum foil in the air fryer for garlic bread?
Yes, you can use foil to catch butter drips. Just make sure it does not block the air circulation. Do not cover the bread completely or it will not crisp.
Why does my garlic bread burn in the air fryer?
Burning usually happens because the temperature is too high. Garlic burns faster than bread. Lower the heat to 350°F and check it earlier next time.
Can I cook frozen garlic bread directly without thawing?
Yes, you can cook it straight from the freezer. It will just need a few extra minutes. Aim for 10 to 12 minutes at 350°F for best results.
What temperature is best for air fryer garlic bread?
350°F is the ideal temperature for most slices. It melts the butter without burning the garlic. You can go up to 375°F for thicker bread.
How do I keep garlic bread crispy after cooking?
Let it rest on a wire rack instead of a plate. This prevents steam from making the bottom soggy. Serve it immediately for the best crunch.
Can I make homemade garlic bread in the air fryer?
Absolutely. Make your butter mixture and spread it on fresh bread. Cook it for 5 to 8 minutes. It works just as well as store-bought frozen slices.



