
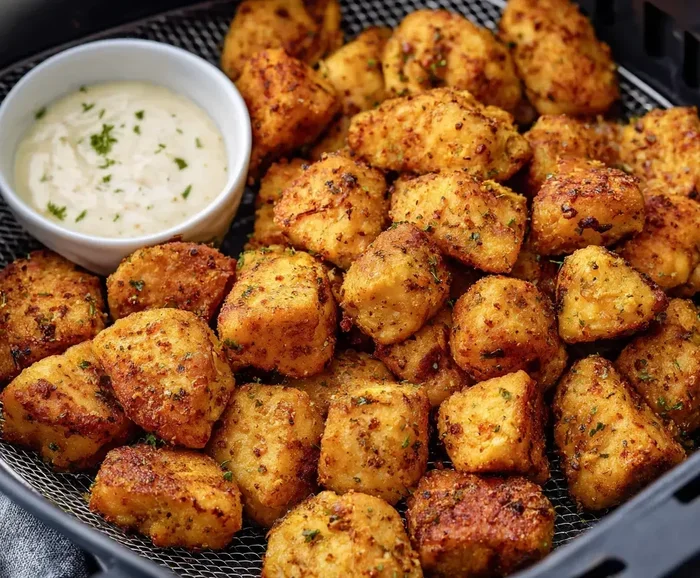
Cooking frozen or fresh poultry snacks is fast and easy with the right settings. How long do chicken bites take in air fryer depends on size and temperature, but usually ranges from 10 to 15 minutes. Getting that golden crunch requires shaking the basket and checking internal heat. This guide covers everything you need for juicy results without the mess.
Everyone loves a good snack that is both tasty and easy to make. Chicken bites are perfect for parties, lunchboxes, or a quick dinner idea. They are small, bite-sized pieces of seasoned poultry that cook very fast. Using an air fryer makes this process even better because it circulates hot air around the food. This creates a crunchy outside without needing lots of oil.
Many people ask how long do chicken bites take in air fryer units to get fully cooked. The answer depends on the size of the pieces and whether they are frozen. Generally, you want them golden brown and cooked through. This method is healthier than deep frying and takes less time than using a regular oven. You get great texture with minimal effort.
In this article, we will walk you through the perfect timing and temperature. We will also share tips on seasoning and safety. You will learn how to avoid dry meat and soggy coatings. By the end, you will be ready to make delicious crispy chicken bites anytime. Let us dive into the details so you can start cooking with confidence.
Key Takeaways
- Cooking Time: Most chicken bites need 10-15 minutes at 400°F for optimal crispiness.
- Temperature Matters: High heat ensures a crunchy exterior while keeping the inside juicy.
- Shake the Basket: Shaking halfway through promotes even browning on all sides.
- Oil Spray: A light coating of oil helps achieve a golden brown finish without deep frying.
- Internal Temp: Always check that the internal temperature reaches 165°F for safety.
- Frozen vs. Fresh: Frozen bites require slightly longer cooking times than fresh ones.
- Preheating: Preheating your appliance ensures consistent cooking results from the start.
📑 Table of Contents
Preparing Your Chicken Bites for Cooking
Before you turn on the machine, you need to prepare the food properly. Good preparation leads to better texture and flavor. Whether you are using raw meat or frozen snacks, the steps are similar. You want to ensure everything is ready for the hot air circulation.
Choosing the Right Cut and Size
You can use breast meat or thigh meat for this recipe. Breast meat is leaner and cooks faster. Thigh meat has more fat and stays juicier. Cut the meat into uniform pieces so they cook evenly. If some pieces are big and some are small, the small ones might dry out. Aim for bite-sized chunks, about one to two inches wide.
You can also buy pre-made frozen chicken bites from the store. These are very convenient and often come breaded. If you make them from scratch, you can control the seasoning. Homemade versions allow you to add fresh herbs and spices. Store-bought options save time but might have more sodium. Both work well in the air fryer basket.
Seasoning and Coating Options
Seasoning is where you can get creative. Salt and pepper are the basics. You can add garlic powder, paprika, or onion powder for more flavor. Some people like a spicy kick with cayenne pepper. Toss the pieces in a bowl with the spices before cooking.
For a crispy coating, you have a few choices. You can use flour, egg wash, and breadcrumbs. Another option is to use a light spray of oil on the seasoned meat. This helps the spices stick and promotes browning. Avoid heavy wet batters because they might drip in the basket. A dry rub or light oil spray works best for air frying.
Cooking Time and Temperature Guidelines
This is the most important part of the process. Getting the heat and time right ensures safety and quality. You do not want raw meat in the middle. You also do not want burnt edges on the outside. The how long do chicken bites take in air fryer question has a standard answer, but adjustments are needed.
Standard Time and Temperature Settings
For most chicken bites, set your air fryer to 400 degrees Fahrenheit. This high heat creates a nice crust. The cooking time usually falls between 10 and 15 minutes. If you are cooking fresh raw pieces, start checking them at the 10-minute mark. Frozen pieces might need an extra 2 to 3 minutes.
Here is a simple breakdown for timing:
- Fresh Chicken Bites: 10-12 minutes at 400°F
- Frozen Chicken Bites: 12-15 minutes at 400°F
- Breaded Bites: 10-14 minutes at 380°F to prevent burning
Always remember that every air fryer is slightly different. Some run hotter than others. It is good practice to check the food a minute or two before the timer ends. This prevents overcooking and keeps the meat tender.
Preheating the Appliance
Preheating is a step many people skip, but it helps. When you preheat, the cooking starts immediately. This helps the outside crisp up faster. If you put food in a cold basket, the meat might release juices before the heat sets the coating. Preheat for about 3 minutes before adding your bites.
Some modern appliances have a preheat function. Others just need you to run them empty for a few minutes. It does not take long but makes a difference in the final result. Think of it like heating a pan on the stove before adding oil. It sets the stage for better cooking.
Step-by-Step Cooking Process
Now that you know the time and temp, let us look at the actual steps. Following a process ensures you do not forget anything. It is simple but requires attention during the cooking cycle.
Arranging the Basket
Do not overcrowd the basket. Air needs to flow around each piece. If you stack them on top of each other, they will steam instead of crisp. Cook in batches if you have a lot of meat. Single layers work best for even browning.
Place the pieces in the basket with a little space between them. This allows the hot air to reach all sides. If you are cooking a large quantity, do two rounds instead of one crowded batch. It takes a bit more time but the quality is much better.
Shaking and Flipping
Halfway through the cooking time, you need to shake the basket. This moves the pieces around so they cook evenly. Some spots in the basket get hotter than others. Shaking ensures every piece gets equal exposure to the heat. You can also use tongs to flip them individually.
Set a timer for halfway through the total cook time. When it goes off, pull the basket out carefully. Give it a good shake and put it back in. This simple step makes a huge difference in texture. It prevents one side from getting too dark while the other stays pale.
Tips for Maximum Crispiness
Everyone wants that crunchy bite. Soft chicken bites can be boring. There are a few tricks to make them extra crispy without deep frying. These tips focus on moisture control and surface texture.
Using Oil Spray Effectively
A light mist of oil helps the seasoning stick. It also aids in the Maillard reaction, which creates browning. Use an oil spray bottle with a high smoke point oil like avocado or canola. Do not soak the meat. Just a light coating is enough.
Spray the basket lightly before putting the food in. This prevents sticking and makes cleanup easier. You can also spray the chicken bites directly before cooking. Avoid using aerosol cooking sprays with propellants as they can damage the basket coating over time. Use a pump spray bottle instead.
Avoiding Soggy Results
Sogginess usually comes from too much moisture. If you wash the chicken, pat it dry with paper towels first. Excess water on the surface creates steam. Steam is the enemy of crispiness. Dry meat browns much better in hot air.
Another cause of sogginess is overcrowding. As mentioned before, give the pieces space. Also, let the cooked bites rest for a minute outside the basket. Putting them on a wire rack instead of a plate helps air circulate underneath. This keeps the bottom from getting wet from trapped heat.
Safety and Doneness Checks
Food safety is critical when cooking poultry. You must ensure the meat is fully cooked before eating. Eating undercooked chicken can lead to illness. Visual cues help, but a thermometer is the best tool.
Checking Internal Temperature
The safe internal temperature for chicken is 165 degrees Fahrenheit. Insert a meat thermometer into the thickest piece. If it reads 165°F, the chicken is safe to eat. If it is lower, put the bites back in for a few more minutes.
Color is not always a reliable indicator. Sometimes meat can look white but still be raw inside. Always trust the thermometer over your eyes. This is especially true for thicker pieces. It takes only a few seconds to check and gives you peace of mind.
Letting the Meat Rest
After cooking, let the chicken bites rest for a few minutes. This allows the juices to redistribute. If you cut into them immediately, the juices might run out. Resting keeps the meat moist and flavorful. It is a small wait for a better eating experience.
You can serve them immediately after resting. They are great hot out of the basket. You can also serve them with dipping sauces. Ranch, honey mustard, or buffalo sauce pairs well with crispy chicken. Enjoy them while they are fresh for the best texture.
Expert Insight
Many chefs recommend brining the chicken before cooking. Soaking the meat in salted water for 30 minutes helps it retain moisture. This prevents the bites from drying out in the high heat. It is an extra step but worth it for juicy results.
Common Mistakes to Avoid
- Overcrowding the basket: Leads to steaming instead of frying.
- Skipping the preheat: Results in uneven cooking times.
- Not shaking the basket: Causes uneven browning on different sides.
- Using too much oil: Can make the coating greasy rather than crisp.
- Ignoring the temperature check: Risks serving undercooked poultry.
Serving Suggestions and Variations
Once your chicken bites are ready, think about how to serve them. They are versatile and fit many meals. You can serve them as an appetizer or a main course. Pairing them with the right sides makes the meal complete.
Dipping Sauces and Sides
Sauces add extra flavor and moisture. Classic ranch dressing is always a hit. Sweet and sour sauce offers a tangy contrast. For something spicy, try a sriracha mayo. You can also make a simple lemon butter sauce for a lighter option.
For sides, consider fresh vegetables. A simple salad balances the richness of the chicken. Coleslaw is a classic pairing with fried chicken styles. Roasted vegetables like broccoli or carrots also work well. You can even cook those vegetables in the air fryer alongside the chicken if you have a large enough basket.
Meal Prep and Storage
Chicken bites are great for meal prep. You can cook a big batch at the start of the week. Store them in an airtight container in the fridge. They will stay good for about 3 to 4 days. Reheat them in the air fryer to restore the crispiness.
Freezing is also an option. Let them cool completely before freezing. Place them in a freezer-safe bag. When you want to eat them, reheat from frozen. Add a few extra minutes to the cooking time. This makes for a quick lunch or snack later on.
Comparing Cooking Methods
You might wonder how air frying compares to other methods. Each method has its pros and cons. Understanding these helps you choose the best one for your situation. Air frying is often the best balance of speed and health.
Air Fryer vs. Oven
Using a regular oven takes longer. You usually need to preheat the oven to 400 or 425 degrees. Cooking time in an oven is often 20 to 25 minutes. The air fryer cooks faster because it is smaller and circulates air more intensely. The oven is better for large batches that do not fit in the fryer.
Air Fryer vs. Deep Frying
Deep frying gives a very crispy texture but uses a lot of oil. It is less healthy and requires more cleanup. Air frying uses little to no oil. The texture is similar but slightly less greasy. For everyday eating, the air fryer is a healthier choice. Deep frying is better for special occasions when you want that specific fried taste.
| Method | Time | Health | Crispiness |
|---|---|---|---|
| Air Fryer | 10-15 mins | High | Very Good |
| Oven | 20-25 mins | High | Good |
| Deep Fry | 5-8 mins | Low | Excellent |
Final Thoughts on Perfect Chicken Bites
Making great chicken bites is all about timing and technique. You now know how long do chicken bites take in air fryer appliances to get the best results. Remember to keep the heat high and the basket uncrowded. Check the internal temperature to ensure safety. With these tips, you can enjoy crispy, juicy chicken anytime.
Experiment with different seasonings to find your favorite flavor. You can try BBQ rubs, herb blends, or spicy mixes. The air fryer is a versatile tool that makes healthy eating easy. Enjoy your delicious homemade snacks with family and friends. Happy cooking!
Frequently Asked Questions
Can I cook frozen chicken bites directly in the air fryer?
Yes, you can cook frozen chicken bites directly without thawing them first. Just add a few extra minutes to the cooking time. Make sure to check the internal temperature to ensure they are fully cooked.
What temperature should I set for breaded chicken bites?
For breaded chicken bites, a slightly lower temperature of 380°F works well. This prevents the breading from burning before the meat cooks through. Cook for about 10 to 14 minutes for best results.
Do I need to flip the chicken bites during cooking?
It is recommended to shake the basket or flip the pieces halfway through. This ensures even browning on all sides. It helps achieve a consistent crispy texture throughout the batch.
How do I prevent chicken bites from sticking to the basket?
Lightly spray the basket with oil before adding the chicken. You can also use a parchment paper liner designed for air fryers. Ensuring the chicken is dry before seasoning also helps reduce sticking.
Can I reheat leftover chicken bites in the air fryer?
Yes, the air fryer is excellent for reheating leftovers. It restores the crispiness better than a microwave. Heat them at 350°F for about 3 to 5 minutes until warm.
Why are my chicken bites dry after cooking?
Dry chicken bites usually result from overcooking or using lean meat without moisture. Try reducing the cooking time slightly. Brining the meat before cooking can also help retain juices.



