
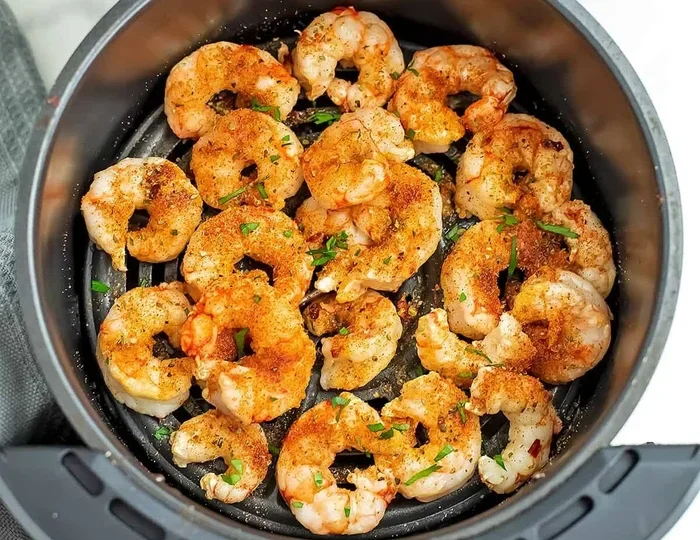
Cooking frozen cooked shrimp in an air fryer is the fastest way to enjoy a warm, tasty seafood meal. You do not need to thaw the shrimp first. This method keeps the shrimp juicy while making the outside crispy. It is perfect for busy weeknights or quick snacks.
Cooking frozen cooked shrimp in air fryer setups is a game changer for busy home cooks. Everyone loves shrimp. It is tasty, healthy, and easy to eat. But sometimes you forget to thaw it. You might find a bag of frozen shrimp in your freezer when hunger strikes. Do not worry. You do not need to wait hours for them to defrost.
The air fryer is the perfect tool for this job. It heats up fast. It circulates hot air around the food. This means your shrimp gets warm quickly. It also helps remove some of the moisture on the surface. This makes the shrimp feel nicer to eat. You get a texture that is closer to freshly cooked seafood.
In this guide, we will show you exactly how to do it. We will cover temperature settings. We will talk about time. We will also share tips to make them taste amazing. You will learn how to avoid common mistakes. By the end, you will be ready to make a delicious meal in minutes. Let us dive into the best way to cook frozen cooked shrimp using your countertop oven.
Key Takeaways
- No Thawing Needed: You can cook frozen cooked shrimp directly from the freezer.
- Fast Cooking Time: It takes only 5 to 7 minutes to heat them through.
- Crispy Texture: The air fryer makes the exterior slightly crispy without drying out the meat.
- Simple Seasoning: A little oil and spice are all you need for great flavor.
- Avoid Overcooking: Watch them closely to prevent toughness.
- Versatile Use: Great for salads, pasta, or eating straight out of the basket.
- Safe Temperature: Ensure the internal temperature reaches 145°F for safety.
📑 Table of Contents
Why Use an Air Fryer for Frozen Shrimp
Many people ask why they should use an air fryer instead of a microwave or stove. The answer is simple. Microwaves often make shrimp rubbery. They heat water molecules inside the food. This can ruin the texture. The stove is great, but it requires a pan and oil. It also takes longer to heat up.
The air fryer offers a middle ground. It is fast like a microwave. But it gives better texture like an oven. The rapid air circulation crisps the outside lightly. This is great for frozen cooked shrimp. Since the shrimp is already cooked, you just need to heat it. You do not want to cook it from raw. Overcooking makes it tough. The air fryer gives you control.
Another benefit is convenience. You do not need to preheat for long. Most models heat up in minutes. You can toss the shrimp in seasoning. Then you put them in the basket. While they cook, you can prepare your side dish. This saves time in the kitchen. It is ideal for quick dinners.
Texture Benefits
Texture matters when eating seafood. No one wants soggy shrimp. Soggy shrimp feels unpleasant. Using an air fryer helps remove surface ice. As the ice melts, the hot air evaporates the water. This leaves the shrimp firmer. It mimics the feel of grilled or pan-seared shrimp.
Also, you can get a slight char. If you use a little oil, the outside can brown. This adds flavor. It makes the meal feel more special. You do not need extra equipment. Just the basket and some spice. This is why cooking frozen cooked shrimp in air fryer units is popular.
Speed and Efficiency
Time is precious. Waiting for water to thaw takes planning. Sometimes you forget. With this method, you cook straight from frozen. This cuts prep time significantly. You save about 20 minutes of thawing time. The cooking time is also short. Usually, it takes less than 10 minutes total.
This efficiency makes it great for snacks too. Kids might want a quick protein boost. You can whip up a batch quickly. It is also good for meal prep. You can cook a large batch. Then store them for later. But fresh is always best. We will talk about storage later. For now, know that speed is a major win.
Preparing Your Frozen Cooked Shrimp
Before you start the machine, you need to prep the food. Proper prep ensures even cooking. If you just dump them in, some might burn. Others might stay cold. Follow these simple steps for the best results.
Check the Packaging
First, look at the bag. Make sure it says cooked shrimp. Some bags contain raw frozen shrimp. Raw shrimp needs different cooking times. You do not want to serve undercooked food. Also, check for ice crystals. A little frost is normal. A block of ice is not. If they are frozen in a solid block, break them apart gently.
You should also check the expiration date. Frozen food lasts a long time. But quality degrades over time. Smell the shrimp after thawing slightly. If it smells sour, throw it away. Fresh shrimp should smell like the ocean. If it smells fishy in a bad way, do not eat it.
Seasoning Options
Frozen cooked shrimp already has flavor. But you can enhance it. Simple is often best. You do not want to mask the seafood taste. Here are some ideas:
- Garlic Butter: Melt butter with minced garlic. Toss the shrimp in it.
- Lemon Pepper: Add zest and pepper for a fresh kick.
- Cajun Spice: For a little heat and depth.
- Olive Oil and Salt: The simplest option works well.
You can toss the shrimp in a bowl before cooking. Or you can spray oil in the basket. Then place the shrimp. This helps prevent sticking. It also helps the seasoning stick to the surface.
Oil and Spray
Using oil is optional but recommended. A light coating helps heat transfer. It also promotes browning. You can use olive oil. You can use avocado oil. Even cooking spray works. Just do not soak them. Too much oil makes them greasy. A light mist is enough.
If you want a healthier option, skip the oil. You can still get good results. The air fryer will still heat them. But you might miss the crispy bits. Try both ways to see what you prefer.
Step-by-Step Cooking Instructions
Now let us get to the core process. This is the most important part. Follow these steps to cook frozen cooked shrimp in air fryer baskets perfectly.
Preheating the Air Fryer
Should you preheat? It depends. Some models need it. Others do not. Preheating ensures the cooking starts immediately. This helps with texture. Set your air fryer to 375°F. Let it run for 2 to 3 minutes. If your model does not have a preheat function, just set the timer. The machine will heat up while you prep.
Temperature is key. 375°F is the sweet spot. Too hot, and the outside burns. Too cool, and they dry out before warming through. 400°F works for some models. But 375°F is safer for delicate seafood.
Arranging the Shrimp
Do not overcrowd the basket. Air needs to flow. If you pack them tight, they steam. Steaming makes them soggy. Lay them in a single layer. If you have too many shrimp, cook in batches. This takes more time. But the quality is worth it.
Place them with space between each piece. This allows the hot air to hit all sides. Flip them halfway through. This ensures even heating. If you do not flip, one side might get too crisp.
Cooking Time and Temperature
How long does it take? For frozen cooked shrimp, start with 5 minutes. Check them at the 4-minute mark. They might be done. Every air fryer is different. Some run hotter. Some run cooler. Use your eyes and nose.
You want them hot. You do not want them cooking further. Since they are already cooked, you are just reheating. Overcooking makes them rubbery. If they look curled tight, they might be overdone. Loose curls are better.
Here is a quick guide:
- Temperature: 375°F to 400°F
- Time: 5 to 7 minutes
- Flip: Halfway through cooking
- Check: Look for warmth and slight browning
Resting and Serving
Once they are done, take them out. Let them rest for a minute. This lets the heat distribute. Then serve immediately. They are best eaten right away. Do not let them sit in the basket. The residual heat continues to cook them.
Serve with lemon wedges. Add a dipping sauce. Cocktail sauce works well. Garlic aioli is also great. You can put them on a salad. You can add them to pasta. The options are endless.
Flavor Variations and Seasoning Ideas
Plain shrimp is good. But flavored shrimp is better. You can get creative. Since the cooking time is short, use dry spices. Wet marinades might drip too much. Dry rubs stick better.
Garlic Butter Style
This is a classic. Melt butter. Mix in garlic powder. Toss the shrimp. Put them in the air fryer. The butter will sizzle. It creates a rich flavor. Add parsley after cooking. This adds color and freshness.
Spicy Cajun Kick
Like heat? Use Cajun seasoning. It has paprika, cayenne, and herbs. Sprinkle it on before cooking. This creates a nice crust. It pairs well with cold drinks. It is perfect for game day snacks.
Lemon Herb Light
Want something fresh? Use dried herbs. Oregano and thyme work well. Add lemon zest if you have it. This is lighter. It is good for healthy meals. You can eat more without feeling heavy.
Common Mistakes to Avoid
Even simple tasks have pitfalls. Avoid these errors to ensure success. Learning what not to do is just as important as knowing the steps.
Overcrowding the Basket
This is the most common mistake. People want to cook everything at once. But air needs space. If the basket is full, the shrimp steam. They become soft and wet. Cook in batches if needed. It is better to wait than to ruin the texture.
Overcooking the Shrimp
Remember, the shrimp is already cooked. You are reheating. If you leave them in too long, they get tough. Rubbery shrimp is unpleasant. Check them early. You can always put them back in for a minute. You cannot undo overcooking.
Skipping the Flip
Hot air comes from the top usually. The bottom might not brown evenly. Flipping helps. It ensures both sides get heat. Do this halfway through the timer. It takes five seconds. It makes a big difference.
Not Using Oil
While you can skip oil, it helps. Without oil, the seasoning might fall off. The shrimp might stick to the basket. A little oil prevents this. It also helps with browning. Do not drown them. Just a light spray.
Storage and Reheating Tips
You might have leftovers. Or you might buy in bulk. Knowing how to store them is vital. Proper storage keeps them safe. It also keeps them tasty.
Storing Cooked Shrimp
If you have cooked shrimp left over, cool it down. Put it in an airtight container. Refrigerate it within two hours. It lasts for 3 to 4 days. You can also freeze it again. But texture might suffer. Freezing twice can make it rubbery.
For more details on keeping your seafood fresh, check out our guide on how to store cooked shrimp. Proper storage ensures you do not waste food.
Reheating Leftovers
You can use the air fryer again. It is the best way to reheat. The microwave makes them soggy. The oven takes too long. The air fryer is quick. Use the same settings. 375°F for 3 to 4 minutes. They heat faster since they are not frozen anymore.
If you want other reheating options, you might like to know how to reheat fried food in air fryers. The principles are similar. You want to restore crispness without drying out the inside.
Expert Insights for Perfect Results
We asked some chefs for tips. Here is what they say. Small tweaks make big changes. These insights come from experience.
Use a Thermometer
If you are unsure, use a meat thermometer. You want an internal temperature of 145°F. This ensures safety. It also tells you when to stop. No more guessing. This is the most accurate method.
Add Fresh Herbs After
Dried herbs work during cooking. But fresh herbs are delicate. Heat kills their flavor. Add fresh parsley or cilantro after cooking. This adds a burst of freshness. It looks nice too.
Pair with the Right Sides
Shrimp is light. Pair it with light sides. A green salad works. Steamed veggies work. Heavy carbs might feel too much. Balance the meal. This makes it more satisfying.
Key Takeaways for Success
To wrap up the main content, remember these points. Success comes from attention to detail. Keep these tips in mind every time you cook.
- Start Cold: Put frozen shrimp directly in the basket.
- Watch the Time: 5 minutes is usually enough.
- Flip Once: Ensure even heating.
- Season Well: Enhance the natural flavor.
- Serve Hot: Eat immediately for best texture.
Cooking seafood does not have to be hard. With the right tools, it is easy. The air fryer simplifies the process. You get great results with minimal effort. Try it tonight for dinner.
Frequently Asked Questions
Can I cook frozen cooked shrimp without thawing?
Yes, you can cook them straight from the freezer. The air fryer heats them quickly. Thawing is not necessary for this method. It saves you time and effort.
How long does it take to cook frozen cooked shrimp in an air fryer?
It typically takes 5 to 7 minutes. The exact time depends on your machine. Check them at the 5-minute mark. You want them heated through but not rubbery.
What temperature should I set the air fryer?
Set the temperature to 375°F or 400°F. 375°F is safer to prevent burning. Higher heat works but watch them closely. Adjust based on your specific model.
Do I need to add oil to the shrimp?
Adding a little oil helps prevent sticking. It also improves browning. You can use cooking spray or olive oil. It is optional but recommended for better texture.
How do I know when the shrimp is done?
Look for a slight pink color and firm texture. They should be hot to the touch. If they curl tightly, they might be overdone. Use a thermometer for precision.
Can I reheat leftover shrimp in the air fryer?
Yes, the air fryer is great for reheating. It takes less time than frozen shrimp. About 3 to 4 minutes is usually enough. This keeps them from getting soggy.



