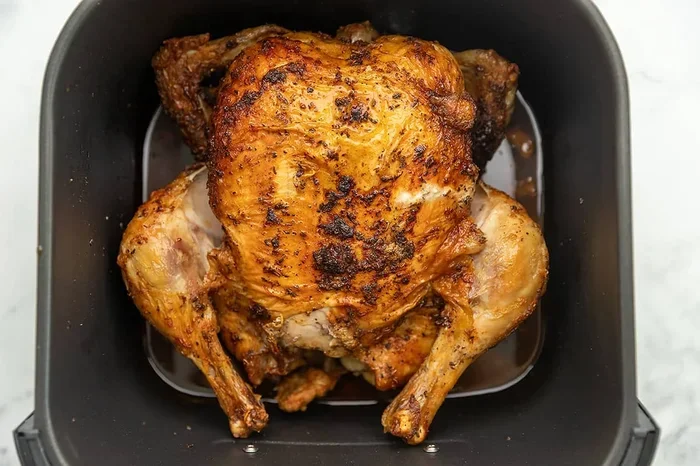
Cooking a full chicken in an air fryer saves time and delivers incredibly crispy skin without the mess. Most whole birds need 35 to 45 minutes at 360°F to 400°F, depending on weight. Always check the internal temperature to hit 165°F in the thickest part. This guide breaks down exact timing, prep steps, and safety checks so you get juicy meat every single time.
Cooking a whole bird has never been easier. You want crispy skin, juicy meat, and zero fuss. That is exactly why so many home cooks are switching to an air fryer oven for dinner. The rapid hot air circulation mimics a convection roast, but it finishes faster and with less oil. If you have ever wondered full chicken in air fryer how long to cook, you are in the right place. I will walk you through timing, temperature, prep, and safety so your next roast turns out perfect.
Key Takeaways
- Timing varies by weight: Plan for roughly 20 to 25 minutes per pound at 360°F to 400°F for a whole bird.
- Crispy skin starts with dryness: Pat the chicken completely dry and add a light coat of oil before cooking.
- Temperature matters most: Use a meat thermometer and pull the bird when the thickest part hits 165°F.
- Trussing helps even cooking: Tie the legs and wings close to the body so the air fryer basket heats uniformly.
- Flip halfway through: Turning the chicken promotes even browning and prevents hot spots.
- Rest before carving: Let the bird sit for 5 to 10 minutes so juices redistribute and stay inside.
- Size limits apply: Most air fryer ovens handle 3 to 5 pound chickens best; larger birds may need spatchcocking.
📑 Table of Contents
Why Air Fry a Whole Chicken for Crispy Skin
An air fryer is really a compact convection oven. It blasts hot air around the food from multiple directions. That fast airflow pulls moisture off the surface of the skin. Less surface moisture means better browning. Better browning means the kind of crispy skin that crackles when you cut into it.
You also get a cleaner cook. No big roasting pan to scrub. No splatter on the oven floor. And you do not need to drown the bird in oil. A light brush of oil is enough. The hot air circulation does the heavy lifting. If you want to understand the science behind it, you can read more about how an air fryer works without oil in our detailed guide.
Another big win is speed. A traditional oven takes longer to preheat and longer to roast. An air fryer oven heats up fast and cooks efficiently. That means dinner lands on the table sooner. It also means you can roast a small whole bird on a busy weeknight without stress.
What Makes Skin Crispy in an Air Fryer
Crispy skin comes down to three things. First, dry surface. Second, enough heat. Third, space for air to move. If the bird sits too close to the walls, the air cannot flow. That leads to soft spots. If the skin is wet, it steams instead of browns. So drying the bird matters just as much as the timer.
A thin layer of oil helps too. You do not need much. Just enough to coat the skin and help heat transfer. Salt also plays a role. Salt draws out a little moisture, then the surface dries again, which improves texture. If you have time, a quick dry brine overnight works wonders. If you are cooking today, pat the bird very dry and season well.
Full Chicken in Air Fryer How Long to Cook
Here is the short answer. A full chicken in an air fryer usually takes 35 to 45 minutes at 360°F to 400°F. The exact time depends on the bird weight, the model of your appliance, and how crowded the basket is. A good rule of thumb is 20 to 25 minutes per pound. That gives you a solid starting point.
Smaller birds cook faster. A 3 pound chicken may finish near 35 to 40 minutes. A 4 pound bird often needs 40 to 45 minutes. A 5 pound bird can push toward 45 to 50 minutes. Always verify with a thermometer. Time is a guide. Temperature is the real signal.
If you are comparing appliances, you might also look at the best 10 in 1 air fryer oven options. More basket space and stronger fans can change your timing slightly. Bigger capacity usually means more even results for a whole bird.
Timing by Chicken Weight
Use this quick reference as your starting point. Adjust based on your specific model and the color of the skin.
- 3 lb chicken: 35 to 40 minutes at 360°F to 380°F
- 4 lb chicken: 40 to 45 minutes at 360°F to 400°F
- 5 lb chicken: 45 to 50 minutes at 360°F to 400°F
These ranges assume a dry, oiled bird with good airflow. If your air fryer basket is smaller, you may need to spatchcock the bird. That flattens it and helps the air reach every part. A flattened bird cooks more evenly and often faster.
Temperature Settings That Work Best
Start at 360°F for the first portion of the cook. This gentle heat helps the inside cook through without burning the skin too early. Then raise the heat near the end if you want extra browning. Many cooks finish at 390°F to 400°F for the last 5 to 10 minutes. That final blast gives you that golden, crispy skin finish.
If your appliance runs hot, stay closer to 360°F the whole time. If it runs cool, you can go a bit higher. Every machine behaves a little differently. The best habit is to check early, then adjust. It is easier to add heat than to fix an overbrowned bird.
How to Prep a Whole Bird for Best Results
Prep is where the magic starts. A well-prepped bird cooks evenly and browns beautifully. Start by removing the giblets and neck from the cavity. Rinse if you like, then dry thoroughly. Use paper towels and press gently all over. The drier the skin, the better the crunch.
Next, season generously. Salt the inside of the cavity, the skin, and the legs. Add pepper, herbs, garlic, or your favorite blend. A simple mix of salt, pepper, paprika, and dried thyme works beautifully. Lightly brush the skin with oil. You do not need a heavy coat. Just enough to help the seasoning stick and the heat transfer.
Truss the bird if you can. Tie the legs together and tuck the wing tips under the body. This keeps the shape compact and helps the air move around it evenly. It also makes the bird easier to handle when you flip it halfway through.
Dry Brining for Extra Crunch
If you have a few hours, dry brining is worth it. Sprinkle salt over the whole bird and leave it uncovered in the fridge. The salt pulls out surface moisture. The skin dries out a bit. That means better browning and deeper flavor. Even 2 to 4 hours helps. Overnight is even better.
If you are short on time, do not worry. A thorough pat-down and a light oil brush still deliver great results. The key is to avoid a wet surface. Wet skin steams. Dry skin crisps. That simple difference changes the whole meal.
Seasoning Ideas That Pair Well
You can keep it simple or get creative. Here are a few easy combos that work well with a whole bird:
- Classic roast: Salt, black pepper, garlic powder, and rosemary
- Herbal lemon: Lemon zest, thyme, oregano, and a little olive oil
- Smoky paprika: Smoked paprika, onion powder, salt, and pepper
- Spiced honey: Light honey glaze near the end with paprika and pepper
Add fresh herbs under the skin if you want extra aroma. Just loosen the skin gently and tuck in sprigs of rosemary or thyme. That little step adds a lot of flavor without much effort.
Cooking Steps for a Juicy, Golden Bird
Now let us walk through the cook itself. These steps keep things simple and reliable. Follow them and you will get a safe, juicy result with a nicely browned exterior.
First, preheat your air fryer oven if your model recommends it. A short preheat helps the skin start crisping right away. Aim for about 3 to 5 minutes. Then place the bird in the basket breast-side up or laid flat if you spatchcocked it. Make sure there is space around the edges for airflow.
Set the temperature to 360°F. Cook for the first half of the estimated time. Then flip the bird carefully. Flipping helps the bottom brown too. It also prevents one side from getting too dark. After the flip, continue cooking until the timer is close to the end.
Checking Doneness the Right Way
A meat thermometer is your best friend here. Insert it into the thickest part of the thigh, without touching the bone. You want the reading to reach 165°F. Check the breast too. It should be at least 165°F as well. If the bird is close, give it a few more minutes.
Do not rely on time alone. Air fryers vary. Bird shape varies. Starting temperature varies. The thermometer removes the guesswork. If you pull the bird too early, the meat can be undercooked. If you leave it too long, it dries out. The internal temperature check keeps you right in the safe zone.
Finishing for Extra Color
If the skin is cooked but not as dark as you want, raise the heat for a short finish. Try 390°F to 400°F for 5 to 8 minutes. Watch it closely. The skin can go from golden to overdone quickly. This final step is optional, but it gives you that deep roast look and extra crunch.
Let the bird rest before carving. Five to ten minutes is enough. Resting lets the juices settle back into the meat. If you cut right away, the juices run out and the meat can dry. A short rest keeps everything moist and tender.
Avoiding Common Mistakes
Even a simple cook can go sideways if a few basics are missed. Here are the most common slip-ups and how to dodge them.
Crowding the basket. If the bird touches the walls too much, air cannot circulate. That leads to uneven browning. Leave some space. If needed, use a smaller bird or spatchcock it.
Skipping the dry step. A wet surface steams the skin. Always pat the bird dry. If you have time, a dry brine helps even more.
Ignoring the thermometer. Guessing the doneness is risky. A quick temperature check keeps you safe and prevents dry meat.
Quick Tips for Consistent Results
These small habits make a big difference over time:
- Use a rack or basket insert if your model has one, to lift the bird slightly
- Flip halfway for more even browning on top and bottom
- Check early and add time in small steps if needed
- Rest the meat before carving for juicier slices
- Clean the basket after each use so old residue does not smoke
Expert Insights on Air Fryer Roasting
Experienced cooks often say the same thing: treat the air fryer like a small convection oven, but respect its size. Smaller space means faster heat and less margin for crowding. That is why airflow matters so much. It is also why flipping and spacing matter more than they do in a big oven.
Another useful habit is to keep a simple cooking log. Note the bird weight, the temperature, the total time, and the final thermometer reading. After a few cooks, you will know exactly how your machine behaves. That makes every future roast easier. If you enjoy experimenting with other proteins, you might also like our guide on how to cook frozen fish in air fryer for quick weeknight meals.
Equipment Choices That Help
Not all air fryer ovens are the same. Basket style and oven style both work, but they behave a little differently. A basket style is great for smaller birds and faster air movement. An oven style often gives more room for a whole bird and easier access for flipping. If you are shopping for a new machine, compare capacity, fan strength, and ease of cleaning.
Some models include racks, rotisserie attachments, or multi-level trays. Those extras can help with a whole bird. A rack lifts the chicken and improves airflow underneath. A rotisserie spins the bird for even exposure. If you want more options, check out the best all in one air fryer toaster oven roundup for versatile setups.
When to Spatchcock Instead
Spatchcocking means removing the backbone and flattening the bird. This is a smart move for smaller baskets or thicker birds. A flat bird exposes more surface to the hot air. That means better browning and more even cooking. It also usually shortens the total time.
If your bird is on the larger side, spatchcocking can save you from uneven results. The legs and thighs finish closer to the breast. You also get more skin surface for that crispy skin texture. It takes a few extra minutes to prep, but the payoff is worth it.
Final Thoughts on Full Chicken in Air Fryer How Long
So, full chicken in air fryer how long should you cook it? Most whole birds land in the 35 to 45 minute range at 360°F to 400°F, with timing scaled to weight. The real secret is not just the clock. It is dry skin, good airflow, a flip halfway through, and a final internal temperature check at 165°F. Do those things, and you will get a safe, juicy roast with beautifully crispy skin.
Start with the timing guide, then adjust for your machine. Keep a thermometer handy. Rest the bird before carving. With a little practice, you will know your setup so well that every roast feels easy. That is the beauty of this method: simple steps, fast results, and a delicious centerpiece for the table.
Frequently Asked Questions
How long do I cook a 4 pound chicken in an air fryer?
A 4 pound chicken usually takes about 40 to 45 minutes at 360°F to 400°F. Always check the thickest part of the thigh with a thermometer to confirm it reaches 165°F.
What temperature is best for crispy skin on a whole chicken?
Start at 360°F for even cooking, then raise to 390°F to 400°F for the last 5 to 10 minutes for extra browning. Dry skin and a light oil coat help the skin crisp up nicely.
Do I need to flip the chicken while it cooks?
Yes, flipping halfway through helps the bottom brown and promotes even cooking. Use tongs carefully and return it to the basket with space around the edges for airflow.
How do I know when the chicken is fully cooked?
Insert a meat thermometer into the thickest part of the thigh without touching the bone. When it reads 165°F, the bird is safe to remove and should rest for 5 to 10 minutes.
Can I cook a 5 pound chicken in a standard air fryer basket?
A 5 pound bird can fit in larger baskets or oven-style models, but it may be tight. If space is limited, spatchcocking the bird helps it cook more evenly and fit better.
Should I brine the chicken before air frying?
Brining is optional, but a short dry brine improves flavor and crispiness by drying the skin surface. If you are short on time, just pat the bird very dry and season well before cooking.