
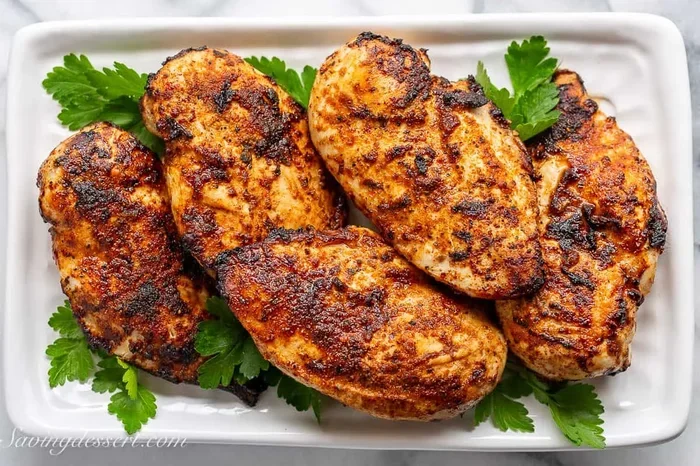
Cooking boneless chicken breast in the air fryer is fast, easy, and gives you juicy results every time. With the right temperature and timing, you can make a healthy dinner in minutes without drying out the meat. This guide shows you exactly how do you cook boneless chicken breast in the air fryer for perfect outcomes. You will learn prep tricks, cooking times, and simple seasoning ideas. Get ready to enjoy tender chicken with less mess and zero stress.
Air fryers have changed the way we make weeknight dinners. They heat up fast and cook food evenly. You can get great results with very little oil. That means less mess and healthier meals. Boneless chicken breast is a perfect match for this appliance. It cooks quickly and stays tender when you handle it right. If you have ever wondered how do you cook boneless chicken breast in the air fryer, you are in the right place. This guide walks you through every step. You will learn prep tricks, timing, and simple seasoning ideas. By the end, you will feel confident making juicy chicken any night of the week.
Many people worry that chicken breast turns dry in the oven. That fear is real. Lean meat can lose moisture fast. But an air fryer solves this problem. The hot air circulates around the food. This creates a crisp outside while keeping the inside soft. You also get speed. Most batches finish in under twenty minutes. That is a huge win on busy days. You can toss in a side dish or a quick salad. Dinner comes together with very little effort. Let us dive into the details and make this easy for you.
Key Takeaways
- Quick Cooking Time: Boneless chicken breast cooks in 12 to 18 minutes at 375°F for fast, weeknight meals.
- Juicy Results: Brining or marinating keeps the meat tender and prevents dryness.
- Even Cooking: Pound the chicken to an even thickness for consistent results.
- Safe Temp: Always check that the internal temperature reaches 165°F.
- Easy Seasoning: Simple spices like garlic powder, paprika, and herbs work beautifully.
- Less Mess: Air frying uses minimal oil and cleanup is a breeze.
- Versatile Meals: Use cooked chicken in salads, wraps, bowls, and more.
📑 Table of Contents
Why Air Fry Boneless Chicken Breast
Boneless chicken breast is a lean protein. It is low in fat and high in nutrients. That makes it a favorite for healthy eating. The challenge is texture. Without care, it can taste bland or dry. An air fryer helps you beat that problem. It cooks fast and seals in juices. You also get a nice golden color on the outside. This method works well for meal prep too. You can make several pieces at once. They reheat well later in the week. If you like simple cooking, this is a smart choice.
Fast and Even Heat
Air fryers move hot air around the basket. This helps the chicken cook evenly. You do not need to flip it too often. The result is consistent texture from edge to edge. It also cuts down on cooking time. You can go from freezer to table in a short window. That is great for families and busy schedules.
Less Oil, More Flavor
You do not need a lot of oil to get great taste. A light spray is enough. The chicken still browns nicely. You can use herbs and spices to build flavor. This keeps the dish light and tasty. It is an easy way to enjoy clean eating without boredom.
How Do You Cook Boneless Chicken Breast In The Air Fryer
This is the core question. The answer is simple when you follow a few steps. Start with fresh or thawed chicken. Pat it dry with paper towels. This helps seasoning stick and improves browning. Season both sides well. You can use a dry rub or a light marinade. Place the pieces in a single layer. Do not crowd the basket. Air needs space to move. Set the temperature to 375°F. Cook for 12 to 18 minutes. Flip halfway through. Check the internal temperature near the end. It should reach 165°F. Let the chicken rest for a few minutes before slicing. That keeps the juices inside.
Prep Steps That Matter
Good prep makes a big difference. Here are the key steps:
- Thaw fully: Cook from fresh or fully thawed for even results.
- Pat dry: Remove surface moisture for better browning.
- Even thickness: Pound thicker parts so the chicken cooks uniformly.
- Season well: Use salt, pepper, garlic, and your favorite herbs.
- Light oil spray: A small amount helps crisp the outside.
Best Temperature and Time
Temperature and time depend on size. Small breasts cook faster. Large ones need a bit more time. A good starting point is 375°F. This heat balances browning and tenderness. For average-sized breasts, aim for 12 to 18 minutes. Flip at the halfway mark. If you prefer a stronger crust, go to 400°F for the last two minutes. Always check the center with a meat thermometer. This is the safest way to know it is done.
Seasoning Ideas For Juicy Chicken
Seasoning turns simple chicken into a great meal. You can keep it basic or get creative. Salt and pepper are a solid start. Add garlic powder for depth. Paprika gives color and a mild sweetness. Dried herbs like thyme or oregano work well too. A touch of onion powder adds savory notes. If you like heat, add a pinch of cayenne. You can also use a light marinade. Lemon juice, olive oil, and herbs make a fresh blend. Soy sauce, ginger, and garlic create an umami kick. Keep the coating thin so it does not burn.
Simple Dry Rub
A dry rub is easy and fast. Mix these ingredients in a small bowl:
- 1 teaspoon salt
- 1 teaspoon garlic powder
- 1 teaspoon paprika
- ½ teaspoon black pepper
- ½ teaspoon dried thyme
Rub the mix over both sides of the chicken. Let it sit for 10 minutes if you have time. This helps the flavors soak in. Then cook as planned.
Quick Marinade Options
Marinades add moisture and taste. You can use them for 30 minutes or overnight. Here are two easy ideas:
- Lemon Herb: Olive oil, lemon juice, garlic, rosemary, and salt.
- Soy Ginger: Soy sauce, sesame oil, ginger, garlic, and a little honey.
Wipe off excess marinade before cooking. This prevents burning and keeps the basket clean.
Tips For Tender, Juicy Results
Juiciness comes from care, not luck. A few small habits make a big difference. First, do not overcook. Chicken breast is lean, so it dries out fast. Pull it at 165°F. Second, let it rest. Resting allows the juices to settle back into the meat. Third, pound the chicken to an even thickness. This stops thin parts from drying out while thick parts finish cooking. Fourth, use a light brine if you have time. A simple saltwater soak helps the meat hold moisture. Fifth, avoid overcrowding. Air flow matters for crispness and even cooking.
Brining Basics
Brining sounds fancy, but it is simple. Mix water and salt in a bowl. A good ratio is 1 tablespoon of salt per cup of water. Soak the chicken for 15 to 30 minutes. Rinse and pat dry before seasoning. This small step helps the breast stay soft and juicy. It is useful for lean cuts like boneless chicken.
Resting Matters
Resting is often skipped, but it helps a lot. Give the chicken 5 minutes after cooking. Cover it loosely with foil if you like. This short pause keeps the juices inside when you cut it. Slicing too soon can release moisture. A quick rest gives you a better bite every time.
Common Mistakes To Avoid
Even easy cooking can go wrong if you miss a few details. Here are the most common errors and how to fix them:
- Cooking from frozen without care: Thaw first for even results. If you must cook from frozen, add time and check temp often.
- Overcrowding the basket: Leave space between pieces for good air flow.
- Skipping the thermometer: Guessing doneness can lead to dry or undercooked chicken.
- Too much oil: A heavy coating can make the chicken soggy.
- Cutting too soon: Rest the meat to keep juices locked in.
- Ignoring thickness: Uneven pieces cook unevenly. Pound them flat.
How To Check Doneness
A meat thermometer is your best tool. Insert it into the thickest part of the breast. Wait for the reading to settle. You want 165°F. If you do not have a thermometer, check the juices. They should run clear, not pink. The texture should feel firm but not hard. When in doubt, cook a minute longer and check again. Safety comes first.
Serving Ideas And Meal Prep
Cooked chicken breast fits many meals. Slice it for salads or grain bowls. Chop it for wraps and tacos. Shred it for sandwiches or soups. You can also keep it whole and top with sauce. For meal prep, cook a batch on Sunday. Store portions in airtight containers. Eat within three to four days. You can freeze extras for later. Reheat gently to keep the texture nice. A quick warm-up in the air fryer works well too.
Quick Meal Ideas
Here are fast ways to use your chicken:
- Chicken Salad: Toss slices with greens, veggies, and a light dressing.
- Wrap: Add chicken, hummus, lettuce, and tomato in a tortilla.
- Bowl: Pair chicken with rice, beans, and roasted veggies.
- Taco: Serve in soft shells with salsa and avocado.
- Sandwich: Layer chicken with cheese and your favorite sauce.
Storage and Reheating
Store cooked chicken in the fridge right away. Use clean containers and keep it chilled. For reheating, a short air fryer session helps restore crispness. Warm at 350°F for a few minutes. Check that it is hot all the way through. If you freeze it, thaw in the fridge before reheating. This keeps the texture better than quick thawing.
Expert Insights For Better Air Frying
Small tweaks can lift your results. Try a light coating of oil spray for better browning. Use parchment liners made for air fryers to simplify cleanup. If your basket is small, cook in batches. This keeps air flow strong. For extra flavor, add a glaze near the end. A little honey mustard or BBQ sauce works well. Add it in the last minute so it does not burn. If you like a stronger crust, finish at a higher heat for two minutes. Always watch the color closely.
Quick Tips Box
- Pound evenly: Flat pieces cook at the same rate.
- Preheat briefly: A warm basket helps start the browning.
- Flip once: Turn the chicken halfway for even color.
- Use a thermometer: This prevents guesswork and dry meat.
- Rest before slicing: Keep the juices where they belong.
Final Thoughts On Juicy Air Fried Chicken
Learning how do you cook boneless chicken breast in the air fryer is simple once you know the basics. Start with good prep. Season well. Keep the basket uncrowded. Cook at 375°F and check the temperature near the end. Rest the meat before cutting. These steps give you tender, juicy chicken with very little effort. You can mix up seasonings and serve it in many ways. It fits busy nights, meal prep, and healthy eating plans. With a few small habits, you will get great results every time. Give it a try and enjoy fast, flavorful dinners with ease.
Frequently Asked Questions
How long does boneless chicken breast take in the air fryer?
It usually takes 12 to 18 minutes at 375°F, depending on size. Flip halfway through and check the internal temperature near the end.
What temperature should I use for chicken breast?
375°F is a great starting point for even cooking and good browning. You can raise it to 400°F for the last two minutes if you want more color.
Do I need to flip the chicken while cooking?
Yes, flipping once halfway helps the chicken cook evenly and brown on both sides. It also improves the texture and color.
How do I keep chicken breast from drying out?
Pat it dry, season well, and avoid overcooking. Brining briefly and resting after cooking also help lock in moisture.
Can I cook frozen boneless chicken breast in the air fryer?
You can, but thawing first gives better results. If cooking from frozen, add extra time and check the temperature often to stay safe.
What internal temperature means the chicken is done?
The chicken is done at 165°F in the thickest part. Use a meat thermometer for the most accurate check and safe results.



