
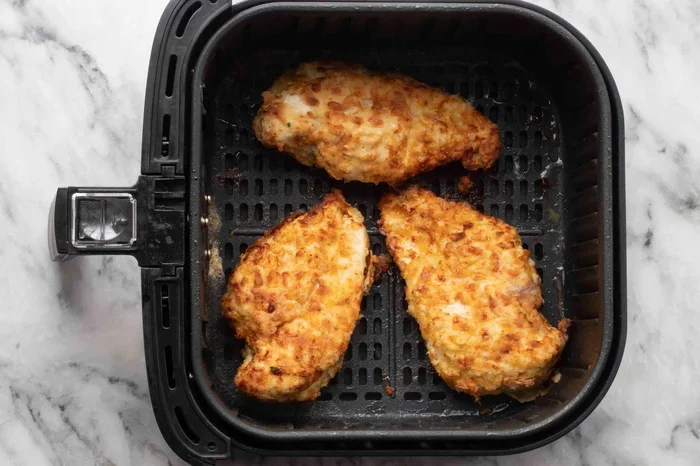
Baking chicken breast in a Ninja Air Fryer is quick, easy, and delivers juicy results with less mess. Most boneless chicken breasts take 10 to 15 minutes at 375°F to 400°F, depending on thickness. Always use a meat thermometer to check for 165°F internal temperature before serving. This method saves time and keeps your healthy chicken recipes tender and flavorful.
Cooking chicken breast does not have to be a guessing game. If you own a Ninja Air Fryer, you already have a powerful tool for making tender, juicy meals with very little effort. Many home cooks ask the same question every week: how long to bake chicken breast in Ninja Air Fryer units? The answer depends on size, thickness, and your preferred texture. In this guide, I will walk you through exact times, temperatures, and simple tricks that guarantee great results. You will also learn how to season, prep, and check doneness like a pro. Let us get started.
Air frying chicken breast is popular because it is fast and clean. You do not need to heat a full oven for a single meal. The compact space circulates hot air around the food, which helps create a light crust while keeping the inside moist. That is a big win for busy weeknights. You can make a quick dinner, a healthy lunch, or a high protein snack without much fuss. The key is knowing the right settings and timing. Once you learn the basics, you can cook chicken with confidence every time.
In the sections below, you will find clear time ranges, step by step instructions, and helpful tips for different cuts. I will also share common mistakes to avoid and quick answers to frequent questions. By the end, you will know exactly how long to bake chicken breast in Ninja Air Fryer models and how to make it taste amazing. Let us dive in.
Key Takeaways
- Cook Time: Boneless chicken breasts typically bake in 10 to 15 minutes at 375°F to 400°F in a Ninja Air Fryer.
- Temperature Check: Always verify doneness with a meat thermometer. Chicken is safe at 165°F internal temperature.
- Thickness Matters: Pound thicker breasts to even thickness for uniform cooking and better texture.
- Preheating Helps: Preheating your Ninja Air Fryer for 3 minutes improves searing and reduces total cook time.
- Resting Is Key: Let chicken rest for 5 minutes after cooking to lock in juices and improve tenderness.
- Seasoning Options: Use dry rubs, marinades, or simple salt and pepper for versatile flavor profiles.
- Avoid Overcrowding: Cook in a single layer with space between pieces for proper air circulation and crispy results.
📑 Table of Contents
- Why Use a Ninja Air Fryer for Chicken Breast
- How Long To Bake Chicken Breast In Ninja Air Fryer
- Best Temperature and Time Settings
- Step by Step Instructions for Perfect Results
- Tips for Juicy and Tender Chicken
- Common Mistakes to Avoid
- Expert Insights for Consistent Cooking
- Serving Ideas and Meal Prep
- Conclusion
Why Use a Ninja Air Fryer for Chicken Breast
A Ninja Air Fryer is a smart choice for cooking chicken breast because it combines speed, convenience, and consistent results. The design uses rapid air technology to move heat around the basket or oven chamber. This helps the chicken cook evenly and develop a pleasant texture on the outside. You also get less oil usage compared with deep frying, which makes the meal lighter and healthier. For many people, that is a major benefit.
Another reason to love this appliance is flexibility. You can cook a single breast or a full family meal with ease. The controls are simple, and many models include preset functions that take the guesswork out of cooking. If you are making quick chicken recipes after a long day, this tool saves time and cleanup. It also works well for meal prep, since you can cook several portions at once and store them for later.
The Ninja Air Fryer is also great for small kitchens or busy households. It heats up fast and does not warm up the whole room like a traditional oven. That means your kitchen stays comfortable, and you can start eating sooner. If you want a reliable way to make juicy chicken breast without much effort, this appliance is a strong option.
Quick Benefits at a Glance
Here is a simple look at why this method works so well for everyday cooking:
- Fast cooking: Small batches cook in minutes, which is perfect for quick dinners.
- Even results: Hot air circulation helps the chicken cook more uniformly.
- Less oil: You can get a crisp surface with very little added fat.
- Easy cleanup: The basket or tray is simple to wash after cooking.
- Versatile use: You can cook fresh or frozen chicken with small adjustments.
How Long To Bake Chicken Breast In Ninja Air Fryer
This is the core question, and the answer is straightforward once you know the size of your chicken. For boneless skinless chicken breast, a common range is 10 to 15 minutes at 375°F to 400°F. Smaller and thinner pieces lean toward the shorter end. Larger or thicker pieces may need a little more time. The best habit is to check the internal temperature before serving. Chicken should reach 165°F to be fully safe and tasty.
If you are cooking frozen chicken breast, the time will increase. You may need 15 to 20 minutes or more, depending on thickness. It helps to separate pieces if they are stuck together and to flip them halfway through. Cooking from frozen is convenient, but it is even better to thaw first for more predictable results. Either way, a thermometer is your best friend.
For bone-in chicken breast, the cook time is usually longer. You might see 20 to 25 minutes at a similar temperature, again depending on size. Bone-in cuts often stay juicier because the bone helps regulate heat. If you prefer crispy skin, you can finish with a short extra blast at a higher temperature. Just keep an eye on the color so it does not overbrown.
Recommended Time and Temperature Chart
Here is a simple reference guide for common chicken breast types:
- Boneless skinless breast, average thickness: 10 to 14 minutes at 375°F to 400°F
- Boneless skinless breast, thick cut: 14 to 18 minutes at 375°F to 400°F
- Frozen boneless breast: 15 to 20 minutes at 375°F to 400°F
- Bone-in breast: 20 to 25 minutes at 375°F to 400°F
- Thin cutlets: 8 to 12 minutes at 375°F to 400°F
These times are starting points. Your Ninja Air Fryer model, the exact size of the chicken, and how full the basket is can all affect the result. Always verify with a thermometer for the best outcome.
Best Temperature and Time Settings
Choosing the right temperature makes a big difference. For most chicken breast air frying tasks, 375°F to 400°F is a sweet spot. At 375°F, the chicken cooks gently and stays moist. At 400°F, you get a bit more browning and a slightly faster cook time. If you like a lightly crisp surface, 400°F is a good choice. If you want extra tenderness, 375°F may be better. Both work well when you monitor the time closely.
It also helps to preheat the Ninja Air Fryer for a few minutes before adding the chicken. Preheating gives the food a strong start and can improve the texture on the outside. Three minutes is usually enough. If your model has a preheat option, use it. If not, just let it run empty for a short time. This small step can make the cooking more consistent.
Another useful setting tip is to avoid overcrowding. Air needs space to move around the chicken. If the basket is too full, the pieces may steam instead of brown. For the best results, arrange the chicken in a single layer with a little space between pieces. If you are cooking a larger amount, work in batches. This keeps the quality high and the timing more reliable.
Smart Setting Tips
- Start at 375°F if you want a gentler cook and extra moisture.
- Use 400°F if you want more browning and a faster finish.
- Preheat briefly to improve texture and reduce guessing.
- Flip halfway for even cooking on both sides.
- Cook in batches when preparing more than one or two pieces.
Step by Step Instructions for Perfect Results
Making great chicken breast in a Ninja Air Fryer is simple when you follow a clear process. Below is a practical method you can use every time. It works well for boneless skinless chicken breast and can be adjusted for other cuts.
First, prepare the chicken. Pat it dry with paper towels so the surface is not wet. Dry chicken browns better and sticks less. If the breast is very thick, you can gently pound it to an even thickness. This helps it cook more uniformly. Season it with salt, pepper, and any spices you like. A little oil on the surface can also improve browning.
Next, preheat the Ninja Air Fryer if you choose to do so. Set it to 375°F or 400°F and let it warm for about 3 minutes. Then place the chicken in the basket or tray in a single layer. Leave a little space around each piece. If you are cooking more than one, make sure they are not stacked.
Then cook the chicken and flip halfway through. For average boneless breasts, this often means about 10 to 14 minutes total. Check the color near the end so you can judge if more time is needed. If you want extra browning, you can add a minute or two, but do it carefully.
Finally, check the internal temperature. Insert a meat thermometer into the thickest part of the chicken. You are looking for 165°F. If it is not there yet, give it a little more time. When it reaches the right temperature, remove the chicken and let it rest for about 5 minutes before slicing. Resting helps the juices stay inside.
Simple Prep Checklist
- Pat dry: Remove surface moisture for better browning.
- Even thickness: Pound thick areas for uniform cooking.
- Season well: Use salt, pepper, spices, or a light marinade.
- Light oil: A small amount helps with color and texture.
- Single layer: Avoid crowding for better air flow.
- Flip halfway: Promote even cooking on both sides.
- Check temperature: Confirm 165°F before serving.
- Rest briefly: Let the chicken sit before cutting.
Tips for Juicy and Tender Chicken
If your goal is juicy chicken breast, a few small habits make a big difference. The first is not overcooking. Chicken breast dries out quickly when it goes past the safe temperature. A thermometer helps you stop at the right moment. Even a minute or two too long can change the texture.
The second tip is to keep the chicken evenly thick. When one end is much thicker than the other, the thin part may dry out before the thick part is done. Pounding the chicken gently solves this problem. It does not need to be perfectly flat. Just make the thickness more even so the heat travels evenly.
The third tip is seasoning. Good flavor makes the meal more enjoyable, and salt is especially important. Season before cooking, and if you like, add a light coating of oil to help the spices stick and improve browning. You can keep it simple or get creative with garlic powder, paprika, onion powder, or dried herbs.
Another helpful habit is resting the chicken after cooking. When you let it sit for a few minutes, the juices redistribute. This makes each bite more tender. If you cut immediately, more juice can escape. A short rest is worth it.
Quick Flavor Ideas
- Classic: Salt, black pepper, and a little garlic powder
- Herbal: Dried thyme, rosemary, and lemon zest
- Smoky: Paprika, garlic powder, and a touch of brown sugar
- Spicy: Chili powder, cayenne, and salt
- Simple and fresh: Olive oil, salt, pepper, and parsley after cooking
Common Mistakes to Avoid
Even an easy recipe can go sideways if a few common mistakes slip in. The good news is they are easy to fix once you know them. Here are the main ones to watch for when you bake chicken breast in a Ninja Air Fryer.
One common mistake is skipping the temperature check. Time alone is not enough because chicken size varies. A thermometer removes the guesswork and helps you avoid dry meat. Another mistake is overcrowding the basket. If the pieces are too close, air cannot move freely, and the chicken may cook unevenly.
Another issue is using too much oil or too little seasoning. A light coating is enough. Too much oil can make the surface feel greasy, while too little seasoning can leave the chicken bland. Balance matters. Also, do not forget to flip the chicken if your method calls for it. Flipping helps both sides brown nicely.
Finally, avoid cutting into the chicken right away. Resting matters, even if you are in a hurry. Those few minutes help keep the juices where they belong. If you want the best texture, give the chicken a short pause before serving.
Mistake Prevention Quick List
- Use a thermometer: Confirm 165°F instead of guessing by time alone.
- Avoid crowding: Leave space for proper air circulation.
- Season adequately: Salt and spices improve flavor and texture.
- Flip when needed: Promote even browning on both sides.
- Rest before slicing: Keep juices inside for a tender bite.
Expert Insights for Consistent Cooking
If you want consistent results every time, build a simple routine. Start by using the same temperature for similar cuts. That makes it easier to learn how your Ninja Air Fryer performs. After a few cooks, you will notice how your specific model handles chicken breast. Every appliance has its own personality, and small observations help a lot.
It also helps to keep notes. Write down the thickness of the chicken, the temperature you used, and the total time. Over time, this becomes a personal reference guide. You will know what works for thin cutlets versus thick breasts. That kind of record is especially useful if you cook for different people with different preferences.
Another expert tip is to think about the full meal, not just the chicken. If you are serving vegetables or starch, you can plan the timing so everything finishes together. For example, you might start a side first and then add the chicken. This makes dinner smoother and less stressful. Good planning turns a quick cook into an easy meal routine.
Pro Tips for Better Results
- Learn your model: Note how your Ninja Air Fryer cooks over time.
- Track thickness: Adjust time based on how thick the breast is.
- Keep a log: Record times and temps for future reference.
- Plan sides early: Coordinate the chicken with the rest of the meal.
- Trust the thermometer: It is the most reliable doneness check.
Serving Ideas and Meal Prep
Once you know how long to bake chicken breast in Ninja Air Fryer setups, the meal possibilities open up. You can slice the chicken for salads, serve it with rice and vegetables, or use it in wraps and bowls. It also works well in healthy chicken recipes because it brings protein without heavy sauces. A simple lemon squeeze or a spoonful of salsa can make it feel fresh and complete.
This chicken is also a strong choice for meal prep. You can cook several breasts at once and store them for later in the week. That saves time on busy days. For storage, let the chicken cool, then keep it in an airtight container in the fridge. Reheating gently helps preserve moisture. If you use it in bowls or sandwiches, sliced chicken is easy to portion out.
If you like variety, change the seasoning each time. One day you can make a classic savory batch, and the next you can try a spicier rub. The base method stays the same, so you get different flavors without extra effort. That makes this approach practical for families and solo cooks alike.
Easy Serving Options
- Salad bowl: Slice over greens with tomatoes and cucumbers
- Wrap: Add chicken, cheese, and your favorite sauce
- Rice bowl: Pair with rice, beans, and roasted vegetables
- Tacos: Use chopped chicken with fresh toppings
- Meal prep: Store portions for quick lunches during the week
Conclusion
Knowing how long to bake chicken breast in Ninja Air Fryer models is a useful skill that makes dinner easier and more reliable. For most boneless breasts, 10 to 15 minutes at 375°F to 400°F is a strong starting point. Thicker pieces, frozen chicken, and bone-in cuts may need more time. The safest habit is to check the internal temperature and aim for 165°F. With a little prep, simple seasoning, and a short rest, you can enjoy juicy chicken breast without much hassle.
The Ninja Air Fryer makes this process fast and convenient. It gives you a crisp touch on the outside while keeping the inside tender when you do not overcook it. Remember to avoid crowding, use a thermometer, and let the chicken rest before slicing. Once you practice a few times, you will find your own rhythm and get consistent results with ease.
So the next time you want a quick, healthy meal, reach for your Ninja Air Fryer and cook with confidence. With the right time, temperature, and a few smart habits, baking chicken breast in a Ninja Air Fryer becomes one of the easiest meals you can make.
Frequently Asked Questions
How long does chicken breast take in a Ninja Air Fryer?
Most boneless skinless chicken breasts take about 10 to 14 minutes at 375°F to 400°F. Thicker pieces may need a little more time, so always check the internal temperature.
What temperature should I use for chicken breast in an air fryer?
A temperature of 375°F to 400°F works well for most chicken breasts. Use 375°F for a gentler cook and 400°F if you want more browning and a faster finish.
How do I know when the chicken is done?
The best way is to use a meat thermometer and check for 165°F in the thickest part. You can also cut into the thickest piece to confirm the juices run clear, but a thermometer is more reliable.
Can I cook frozen chicken breast in a Ninja Air Fryer?
Yes, you can cook frozen chicken breast, but it usually takes longer, often 15 to 20 minutes or more. It helps to separate the pieces and flip them halfway through for more even cooking.
Should I preheat the Ninja Air Fryer before cooking chicken?
Preheating for about 3 minutes can help the chicken start cooking right away and improve browning. It is not always required, but it often leads to more consistent results.
How can I keep chicken breast from drying out?
Do not overcook it, and check the temperature early with a thermometer. Pounding the chicken to even thickness, seasoning well, and letting it rest for a few minutes also help keep it juicy.



