
Cooking rice in a pressure cooker is quick and efficient, but getting the water-to-rice ratio right is key to fluffy, non-sticky results. The general rule is 1:1.25 ratio (one part rice to 1.25 parts water), though this varies by grain type and cooker model. Always adjust based on your rice’s texture preference and altitude for best results.
Cooking rice in a pressure cooker has become one of the most beloved kitchen shortcuts for busy families, health-conscious cooks, and anyone who wants perfectly fluffy grains without constant monitoring. Unlike traditional stovetop methods that can take over 30 minutes, pressure cooking cuts that time down significantly—often finishing in under 15 minutes. But here’s the catch: even with a powerful appliance like an Instant Pot or Cuisinart pressure cooker, the secret to great rice isn’t just speed—it’s precision. And that starts with knowing exactly how much water to put in pressure cooker for rice.
Getting the water level just right ensures your rice turns out tender, separated, and never gummy. Too little water? Your grains might be hard and undercooked at the core. Too much? You end up with mushy, glue-like clumps that ruin even the finest basmati. The good news? Once you master the basics, you’ll be making restaurant-quality rice at home every single time—no chef skills required.
In this guide, we’ll walk through everything from foundational ratios to advanced troubleshooting, so you never have to wonder again about the magic number for water when using your pressure cooker. Whether you’re new to electric pressure cookers or upgrading from a stovetop model, these tips will help you achieve consistently delicious results.
Key Takeaways
- Standard Ratio: Use a 1:1.25 rice-to-water ratio (e.g., 1 cup rice to 1.25 cups water) as a starting point for most grains.
- Grain Variability: Short-grain rice needs less water than long-grain; brown rice requires more due to its bran layer absorbing moisture.
- Cooker Matters: Different brands (like Cuisinart or Instant Pot) may have varying sealing efficiencies—adjust slightly if rice is too dry or mushy.
- Altitude Adjustments: At higher elevations, increase water by 1–2 tablespoons per cup of rice to compensate for lower boiling points.
- Taste Test First: For perfect results, do a small test batch before cooking a full meal to fine-tune your ratio.
- Avoid Overfilling: Never exceed the cooker’s max fill line—this ensures proper steam release and prevents clogging.
- Rest Time Counts: Let cooked rice sit sealed for 5–10 minutes after pressure release; this allows residual heat to finish steaming evenly.
📑 Table of Contents
- The Science Behind Pressure Cooking Rice
- General Guidelines: How Much Water Per Cup of Rice?
- Step-by-Step: Perfect Rice in Your Pressure Cooker
- Special Cases: Brown Rice, Wild Rice, and Beyond
- Maintaining Your Pressure Cooker for Optimal Performance
- Creative Uses for Leftover Cooked Rice
- Final Tips for Flawless Every Time
The Science Behind Pressure Cooking Rice
Before diving into measurements, it helps to understand why pressure cooking works so well for rice—and why water control is critical. In a sealed environment, steam builds up, raising the internal temperature above 212°F (100°C). This intense heat rapidly penetrates the grains, breaking down starches quickly while preserving their structure. However, because there’s no evaporation during cooking (thanks to the tight seal), every drop of water contributes directly to the final texture.
That’s why measuring water accurately isn’t optional—it’s essential. Most modern pressure cookers come with markings inside the pot indicating safe fill levels, but those are usually based on average recipes rather than individual grain types or personal preferences. So while you might start with the standard recommendation, always be ready to tweak based on your specific setup and taste.
Why Water Ratio Matters More Than You Think
Imagine trying to bake bread without measuring flour—you could end up with dense bricks or flying loaves everywhere. It’s the same principle with rice. Water acts as both a medium for heat transfer and a vehicle for starch gelatinization (the process that makes rice soft yet separate). If the balance is off, even a high-end pressure cooker can’t fix what went wrong at the beginning.
For example, jasmine rice naturally releases more starch than arborio, which means it tends to get stickier unless you rinse it first and use slightly less water. Meanwhile, brown rice has a protective outer layer (the bran) that traps moisture, requiring extra liquid to fully cook through. These nuances mean universal rules only go so far—your ideal ratio may differ from your neighbor’s by a few tablespoons.
General Guidelines: How Much Water Per Cup of Rice?
Visual guide about How Much Water to Put in Pressure Cooker for Rice
Image source: expertreviewsbestricecooker.com
At its core, the golden rule remains simple: **use 1 cup of uncooked rice paired with 1.25 cups of water**. This 1:1.25 ratio serves as an excellent baseline for white rice varieties like basmati, jasmine, or American long grain. It accounts for expansion during cooking while leaving enough room for steam generation without overflowing.
However, this doesn’t apply equally to all grains. Below are adjusted guidelines for common types:
– **White short-grain (e.g., sushi rice):** 1 cup rice : 1.125 cups water
– **Long-grain white (basmati/jasmine):** 1 cup rice : 1.25 cups water
– **Brown rice:** 1 cup rice : 1.5–1.75 cups water
– **Wild or black rice:** 1 cup rice : 2 cups water
Always measure using dry measuring cups—not liquid ones—since rice settles differently when compacted versus poured loosely. Also note that rinsing rice before cooking removes excess surface starch, which can reduce stickiness and improve texture—especially important if you’re aiming for distinct, fluffy grains.
Adjusting for Altitude and Humidity
Living above sea level changes how water behaves in your kitchen. At higher altitudes, atmospheric pressure drops, meaning water boils at lower temperatures. This slows down the cooking process, potentially leading to undercooked centers if you stick strictly to standard ratios. To counteract this, add an additional tablespoon of water per cup of rice for every 1,000 feet above 3,000 feet elevation.
Similarly, in humid climates, ambient moisture can affect how quickly your rice absorbs liquid. If you notice your rice turning out softer than expected, try reducing water by 1–2 tablespoons next time. Conversely, in dry, arid regions, you might need to increase slightly to prevent dryness.
Step-by-Step: Perfect Rice in Your Pressure Cooker
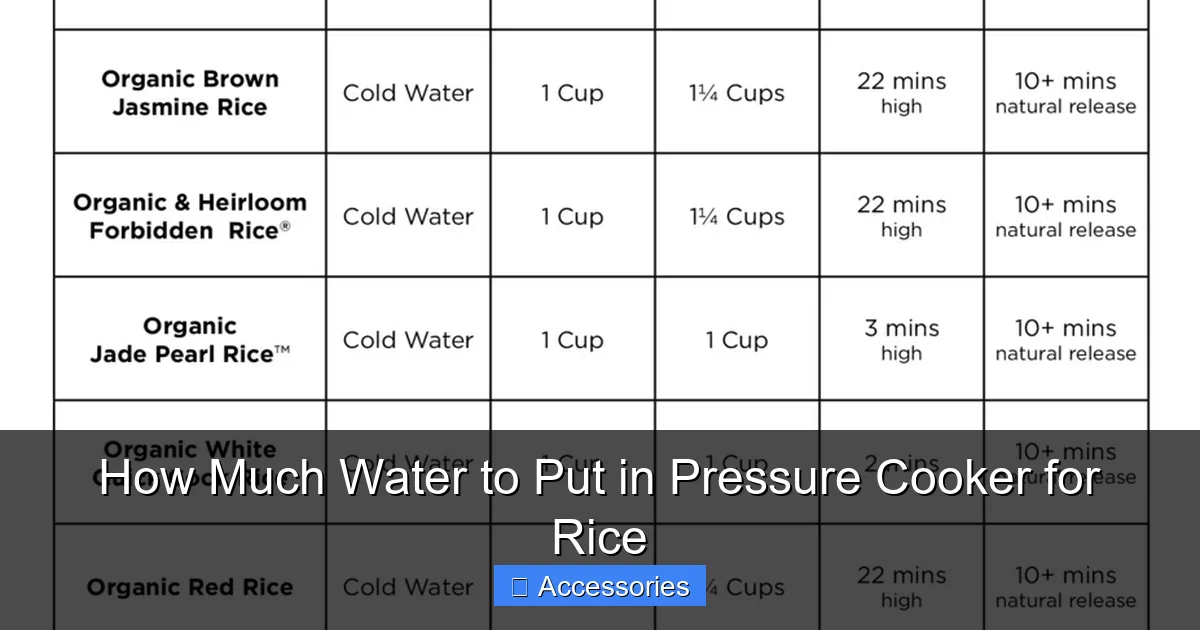
Visual guide about How Much Water to Put in Pressure Cooker for Rice
Image source: cdn.shopify.com
Now that you understand the fundamentals, let’s put them into practice. Follow these steps for foolproof results every time:
1. **Rinse your rice** (optional but recommended): Place rice in a strainer and rinse under cold running water until the water runs clear. This removes excess starch and reduces clumping.
2. **Add ingredients**: Transfer rinsed (or unrinsed) rice to the pressure cooker pot. Pour in measured water according to your chosen ratio.
3. **Season lightly**: Add a pinch of salt or a pat of butter if desired—these won’t interfere with timing but enhance flavor.
4. **Secure lid and set valve**: Make sure the sealing ring is properly placed and the pressure release valve is set to “Sealing.” Do not open or tamper with it until cooking completes.
5. **Select appropriate setting**: Most pressure cookers offer a dedicated “Rice” mode. If unavailable, use “Manual” or “Pressure Cook” for 3–5 minutes depending on grain type.
6. **Natural release**: After timer ends, let the cooker sit undisturbed for 5–10 minutes with the valve still sealed. Then carefully turn the valve to “Venting” to release remaining pressure safely.
7. **Fluff and serve**: Open the lid away from your face, gently fluff rice with a fork, and enjoy!
Pro tip: Never rush the natural release phase. Doing so leads to uneven textures and potential burns from sudden steam bursts.
Common Mistakes to Avoid
Even experienced cooks occasionally run into issues. Here are frequent pitfalls and how to avoid them:
– **Overfilling the pot**: Exceeding the max fill line blocks steam vents and risks damaging your appliance. Stick to the manufacturer’s guidelines.
– **Skipping rinsing**: While not mandatory, skipping this step increases the chance of gumminess—particularly with sticky short-grain varieties.
– **Using cold tap water**: Cold water takes longer to heat up, extending overall cook time. Warm water yields faster, more consistent results.
– **Ignoring cooker-specific quirks**: Some models retain more heat post-cooking than others. If your rice is still al dente after natural release, try adding another minute of pressurized cooking next time.
Special Cases: Brown Rice, Wild Rice, and Beyond
Visual guide about How Much Water to Put in Pressure Cooker for Rice
Image source: expertreviewsbestricecooker.com
While white rice follows predictable patterns, specialty grains demand attention to detail. Brown rice, for instance, takes longer to soften due to its fibrous outer shell. That’s why it needs nearly double the water volume compared to white rice—usually around 1.5 to 1.75 cups per cup of grain.
Wild rice behaves similarly but expands even more dramatically. Because it’s actually a seed from aquatic grass, it swells significantly during cooking and requires up to 2 full cups of water. Black rice, often labeled as “forbidden rice,” also needs generous hydration—typically 1.75–2 cups per cup of grain—to achieve that deep purple hue and chewy-yet-tender bite.
When in doubt, consult your pressure cooker manual for preset programs tailored to these grains. Many modern units include specialized modes that automatically adjust time and pressure accordingly.
Dealing With Sticky or Mushy Results
If your last batch turned out clumpy or overly soft, don’t panic. There are easy fixes:
– **Too sticky?** You used too much water or didn’t rinse thoroughly. Next time, reduce water by 1–2 tablespoons and always rinse before cooking.
– **Too dry/hard?** Undercooked or insufficient liquid caused this. Increase water incrementally (by 1 tbsp at a time) until desired tenderness is achieved.
– **Uneven texture?** Stirring mid-cook isn’t possible in sealed pressure cookers, but letting rice rest sealed helps redistribute heat evenly.
For future reference, keep notes on what worked best—different brands of rice behave differently even within the same category!
Maintaining Your Pressure Cooker for Optimal Performance
Beyond recipe accuracy, proper maintenance ensures reliable performance over years of use. Clean the sealing ring regularly (it’s often dishwasher-safe), check vent pipes for blockages, and replace worn-out parts promptly. A well-cared-for machine will handle water ratios precisely every single time.
Also consider investing in a kitchen scale for ultra-precise measurements if you frequently cook large quantities or experiment with international cuisines. Digital scales eliminate guesswork and make scaling recipes effortless.
Comparing Brands: What Sets Them Apart?
Not all pressure cookers are created equal. Models from Cuisinart, Instant Pot, Ninja, and others vary in heat distribution, sealing efficiency, and preset algorithms. For example, the Cuisinart 6 Quart Pressure Cooker excels at retaining moisture, making it ideal for delicate grains like risotto bases. Meanwhile, Instant Pots tend to cook faster due to higher maximum pressures.
When choosing between models, read reviews focusing specifically on rice performance. Look for feedback about texture consistency and ease of cleaning—after all, you’ll be using this feature often!
Creative Uses for Leftover Cooked Rice
Once you’ve mastered perfect pressure-cooked rice, you’ll want to stretch every last grain. Freeze portions in airtight containers for up to 3 months—just thaw overnight in the fridge before reheating. Or transform it into crispy fried rice using a nonstick pan and a splash of soy sauce (see our guide on crispy rice in air fryer for oven-free options).
You can also repurpose leftover rice into veggie burgers, rice pudding, or even savory breakfast bowls. The versatility of properly cooked pressure rice opens up endless culinary possibilities.
Final Tips for Flawless Every Time
To wrap things up, remember these golden rules:
– Start with the 1:1.25 base ratio and adjust based on results.
– Always rinse sticky grains like jasmine or sushi rice.
– Respect natural release times—rushing leads to poor outcomes.
– Keep your cooker clean and calibrated for consistent performance.
– Experiment gradually; small tweaks yield big improvements.
With patience and practice, you’ll soon find yourself confidently navigating any rice recipe with ease. No more guessing games—just perfect, fluffy grains straight from your pressure cooker.
Frequently Asked Questions
How much water should I use for 1 cup of basmati rice in a pressure cooker?
Use 1.25 cups of water for every 1 cup of uncooked basmati rice. This ratio ensures fluffy, separated grains without excess moisture.
Can I substitute brown rice for white rice in my pressure cooker?
Yes, but brown rice needs more water—about 1.5 to 1.75 cups per cup of rice—due to its bran layer slowing absorption.
Why is my pressure cooker rice always mushy?
Mushiness usually results from too much water or not rinsing sticky grains. Try reducing water by 1–2 tablespoons and always rinse jasmine or sushi rice before cooking.
Do I need to soak rice before pressure cooking?
Soaking isn’t required but can reduce cook time slightly and improve texture uniformity, especially for brown rice.
What happens if I add too little water to my pressure cooker rice?
Undercooked, hard rice with chalky centers occurs when insufficient water prevents complete gelatinization of starches.
Can I cook frozen rice in a pressure cooker?
No—frozen rice introduces excess steam and disrupts pressure regulation. Always use fresh, dry rice for best results.