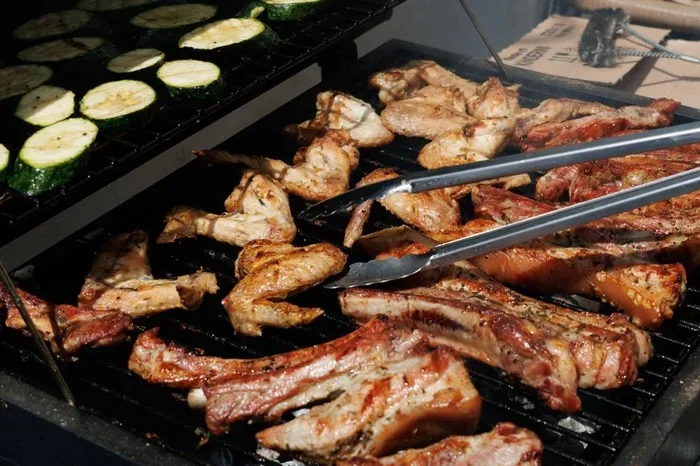
BBQ ribs on a gas grill don’t have to be complicated. With the right temperature, a good rub, and a little patience, you can make fall-off-the-bone tender ribs at home. This guide walks you through every step so even beginners can achieve amazing results.
There’s nothing quite like pulling a rack of ribs off the grill and watching the meat pull away from the bone on its own. BBQ ribs on a gas grill are easier than most people think. You don’t need a fancy smoker or years of experience. A standard propane grill and a little know-how are all you need.
Whether you’re a weekend warrior or a total beginner, this guide will show you how to make tender ribs that rival your favorite barbecue joint. We’ll cover everything from choosing the right ribs to nailing the perfect smoke flavor. By the end, you’ll wonder why you ever ordered ribs from a restaurant.
The beauty of using a gas grill for ribs is control. You set the temperature, manage the heat, and focus on the food. No worrying about charcoal briquettes or ash cleanup. Just pure, delicious grilling ribs with consistent results every single time.
Key Takeaways
- Low and slow cooking is the secret to tender gas grill ribs.
- Removing the rib membrane lets seasoning penetrate deeper for better flavor.
- Using a rib rack saves space and promotes even cooking on your grill.
- The 2-2-1 method gives you perfectly smoked ribs with a great bark.
- Resting your ribs after cooking keeps them juicy and easy to slice.
- Wood chips add smoke flavor that mimics a traditional charcoal or wood smoker.
- Keeping your grill grates clean prevents sticking and ensures beautiful grill marks.
📑 Table of Contents
- Choosing the Right Ribs for Your Gas Grill
- Preparing Your Ribs the Right Way
- The 2-2-1 Method for Perfect Ribs
- Managing Temperature on Your Gas Grill
- Adding Smoke Flavor Without a Smoker
- Safety Tips for Grilling Ribs
- Serving and Storing Your Ribs
- Common Mistakes to Avoid
- Expert Tips for Next-Level Ribs
- Conclusion
Choosing the Right Ribs for Your Gas Grill
Not all ribs are created equal. The cut you choose matters a lot for your final result. Let’s break down the most popular options so you can pick the best ones for your next cookout.
Baby Back Ribs vs. Spare Ribs
Baby back ribs come from the top of the pig’s rib cage, near the backbone. They’re leaner, smaller, and cook faster than spare ribs. Most people love them because they’re tender and don’t require as much time on the grill.
Spare ribs come from the belly side of the rib cage. They have more fat and more connective tissue, which means they need longer cooking times. But that extra fat also means more flavor when done right. Many pitmasters prefer spare ribs for their rich, beefy taste.
Bone-In vs. Boneless Ribs
Most grilling experts recommend bone-in ribs. The bone acts as a natural heat shield, keeping the meat moist during the long cook. It also gives you a handle for easy turning and serving.
Boneless ribs cook faster and are easier to eat, but they can dry out more quickly. If you go boneless, watch your grill temperature closely and pull them off early.
Preparing Your Ribs the Right Way
Proper prep is the foundation of great ribs. Skip this step, and even the best gas grill ribs will fall flat. Take your time here, and the rest of the process becomes much easier.
Removing the Membrane
The thin, papery membrane on the back of the rack is the number one mistake home cooks make. It blocks seasoning from reaching the meat and creates a chewy texture nobody wants. Here’s how to remove it:
- Flip the ribs so the bone side faces up.
- Slide a butter knife under the membrane at one edge.
- Lift it gently and grip it with a paper towel for better hold.
- Pull it off in one smooth motion.
It takes about 30 seconds per rack. That tiny effort makes a huge difference in how your tender ribs turn out.
Applying the Perfect Rib Rub
A good rib rub builds flavor layers. Most rubs combine brown sugar, paprika, garlic powder, onion powder, salt, and black pepper. You can buy pre-made rubs or make your own in minutes.
Apply the rub generously on all sides. Let the seasoned ribs sit in the fridge for at least one hour, or overnight for the best results. The longer they sit, the deeper the flavor penetrates.
Bringing Ribs to Room Temperature
Take your ribs off the fridge about 30 minutes before grilling. Cold meat cooks unevenly on a propane grill. Room temperature ribs absorb heat more consistently, which leads to better low and slow cooking results.
The 2-2-1 Method for Perfect Ribs
The 2-2-1 method is the gold standard for grilling ribs on a gas grill. It divides the cook into three phases, each with a specific purpose. This approach works beautifully for both baby back and spare ribs.
Phase 1: Two Hours of Smoke
Set up your grill for indirect heat. Place a drip pan on one side and keep the ribs on the other. Add wood chips to your smoker box or foil pouch to generate smoke. Close the lid and maintain a temperature of around 225°F to 250°F.
During these first two hours, the smoke flavor penetrates the meat and the rub starts to form a crusty bark. Resist the urge to open the lid too often. Every time you lift it, you lose heat and smoke.
Phase 2: Two Hours Wrapped in Foil
After two hours, remove the ribs from the grill. Lay them out on a large sheet of aluminum foil. Add a splash of apple juice, cider vinegar, or broth to create steam. Wrap them tightly and place them back on the grill.
This step breaks down the collagen in the connective tissue, making the meat incredibly tender. The fall-off-the-bone ribs texture starts here. Keep the temperature steady at 225°F to 250°F.
Phase 3: One Hour Unwrapped with Sauce
Unwrap the ribs and return them to the grill. Now it’s time to apply your favorite bbq sauce. Brush it on generously during the final hour. The sauce will caramelize and create a sticky, glossy finish.
This last phase also lets the surface dry slightly, which gives you that beautiful caramelized exterior. Watch carefully so the sauce doesn’t burn from the sugars.
Managing Temperature on Your Gas Grill
Temperature control is the single most important factor in grilling ribs on a gas grill. Too hot, and the meat seizes up and dries out. Too cool, and the cook takes forever with poor results.
Setting Up Indirect Heat
For low and slow cooking, you need indirect heat. Turn one or two burners to low and leave the others off. Place the ribs over the unlit side of the grill. This creates an oven-like environment that cooks the meat gently and evenly.
A good setup looks like this:
- Left burner: off
- Center burner: low (250°F)
- Right burner: off
This creates a cool zone and a warm zone. You can move the ribs around as needed to manage heat fluctuations.
Using a Grill Thermometer
Don’t trust the dial on your grill. Invest in a reliable grill thermometer and place it near the cooking grate. Internal temperature matters more than the dial setting because wind, cold weather, and grill age all affect actual heat output.
Keeping the Lid Closed
Every time you open the lid, you add 15 to 20 minutes to your cook time. Treat your grill like an oven. Open it only when you need to check the temperature, add wood chips, or apply sauce.
Adding Smoke Flavor Without a Smoker
One of the biggest advantages of BBQ ribs on a gas grill is that you can add authentic smoke flavor without a dedicated smoker. You just need the right tools and materials.
Best Wood Chips for Ribs
Not all wood chips are the same. Some pair better with pork ribs than others:
- Hickory — Strong, classic BBQ flavor. Works great with spare ribs.
- Applewood — Mild and sweet. Perfect for baby back ribs.
- Cherry — Fruity and mild. Gives ribs a beautiful dark color.
- Pecan — Nutty and rich. A versatile all-around choice.
- Mesquite — Very strong. Use sparingly so it doesn’t overpower the meat.
Soak your wood chips in water for 30 minutes before using them. This slows the burn and extends the smoke production. Place the chips in a smoker box or wrap them in foil with holes poked in the top.
Using a Wood Chip Holder
A dedicated wood chip holder for gas grill makes adding smoke much easier. These small accessories sit on or near your burner and hold chips without them falling through the grates. They also make cleanup simpler since you don’t have to deal with scattered chips everywhere.
Consider checking out a quality wood chip holder if you plan to smoke ribs regularly on your gas grill.
Safety Tips for Grilling Ribs
Grilling is fun, but safety should always come first. Grease fires are one of the most common hazards when cooking ribs on a gas grill. The fat rendering from the meat can drip onto the burners and ignite.
Preventing Grease Fires
Keep your drip pan full and positioned correctly. Use a drip pan setup that catches all the rendered fat before it reaches the heat source. Never use water to extinguish a grease fire — that causes a dangerous flare-up.
Keep a grill lid nearby so you can smother small flames quickly. A metal lid works better than a glass one because it won’t crack from the heat.
Handling Flare-Ups Safely
If a flare-up occurs, move the ribs to the cooler side of the grill immediately. Close the lid and shut off the burner under the flare-up zone. The fire will suffocate without oxygen. Never spray water on a grease fire.
Post-Cook Grill Maintenance
Clean your grill grates while they’re still warm. A quick brush removes stuck-on residue and prevents buildup that can cause flare-ups later. For thorough cleaning, follow a proper grill cleaning routine after each cook.
Serving and Storing Your Ribs
Your ribs are done when the meat pulls back from the bone tips by about a quarter inch and the rack bends easily when you pick it up with tongs. That bend tells you the collagen has broken down and the texture is perfect.
Letting Ribs Rest
Pull your ribs off the grill and let them rest for 10 to 15 minutes. This allows the juices to redistribute throughout the meat. If you cut too early, all those flavorful juices run out onto the cutting board instead of staying in the meat.
Slicing and Serving
Use a sharp knife to cut between each bone. Serve individual ribs so each person gets a perfect portion. Offer extra bbq sauce on the side so everyone can add their preferred amount.
Storing Leftover Ribs
Store leftover ribs in an airtight container in the fridge for up to four days. Reheat them in the oven at 250°F with a splash of broth to keep them moist. Microwaving tends to dry them out, so avoid it if possible.
Common Mistakes to Avoid
- Cooking too hot. High heat dries out ribs before the connective tissue has time to break down.
- Skipping the membrane removal. This simple step makes a noticeable difference in texture.
- Opening the lid too often. Every peek adds time and disrupts the smoke environment.
- Saucing too early. Sugar-based sauces burn if applied too soon. Wait for the final phase.
- Not letting ribs rest. Skipping the rest period means drier, less flavorful meat.
Expert Tips for Next-Level Ribs
Ready to take your grilling ribs to the next level? These pro tips separate good ribs from unforgettable ones:
- Use a rib rack to stack multiple racks vertically and save grill space.
- Apply a light coat of mustard before the rub. It acts as a binder and adds tang.
- Inject a brine solution into thick sections for extra moisture.
- Try the “3-2-1 method” for thicker spare ribs that need more time.
- Add a handful of fresh herbs like rosemary or thyme to your foil wrap for extra aroma.
Experiment with different rubs, wood chips, and sauces to find your personal style. The best BBQ ribs on a gas grill are the ones you enjoy making and sharing with others.
Conclusion
BBQ ribs on a gas grill are one of the most rewarding things you can cook at home. With the right cut, a solid rub, proper temperature management, and a little patience, you’ll make ribs that everyone will rave about. The 2-2-1 method gives you a reliable framework that works every time, whether you’re cooking for a family dinner or a backyard gathering.
Start with these steps, practice a few times, and you’ll develop confidence and your own style. Remember that great ribs come from consistency, not perfection. Keep your grill clean, your temperatures steady, and your smoke flowing. Before long, you’ll be the person everyone asks for tender ribs at every cookout.
Now fire up your propane grill, grab a rack of ribs, and enjoy the process. The best ribs you’ve ever made are just one cook away.
Frequently Asked Questions
What temperature should I cook ribs on a gas grill?
Maintain a temperature between 225°F and 250°F for the best results. This low and slow approach breaks down the connective tissue in the ribs, making them tender and juicy. Use a grill thermometer to monitor the heat accurately throughout the entire cook.
How long does it take to cook ribs on a gas grill?
Most ribs take about 4 to 6 hours using the 2-2-1 method. Baby back ribs usually finish closer to 4 hours, while spare ribs may need the full 6 hours. The actual time depends on the thickness of the meat and your grill’s temperature consistency.
Do I need a smoker box for gas grill ribs?
A smoker box helps, but it’s not required. You can wrap wood chips in aluminum foil with holes poked in the top and place them directly on the burner. A dedicated smoker box or wood chip holder makes the process cleaner and more convenient.
Can I use frozen ribs on the gas grill?
It’s best to thaw ribs completely before grilling. Frozen ribs cook unevenly and may develop a tough texture on the outside while still frozen in the center. Thaw them in the refrigerator overnight for the safest and most even results.
How do I know when ribs are done?
Done ribs have meat that pulls back from the bone tips by about a quarter inch. The rack should bend easily when you lift it with tongs from one end. The internal temperature should reach around 195°F to 203°F for optimal tenderness.
Should I sauce my ribs during the cook or after?
Apply sauce during the last phase of cooking, usually the final 30 to 60 minutes. Sauces with sugar burn easily at high heat, so adding them too early causes sticking and bitter flavors. You can also serve extra sauce on the side for dipping.