
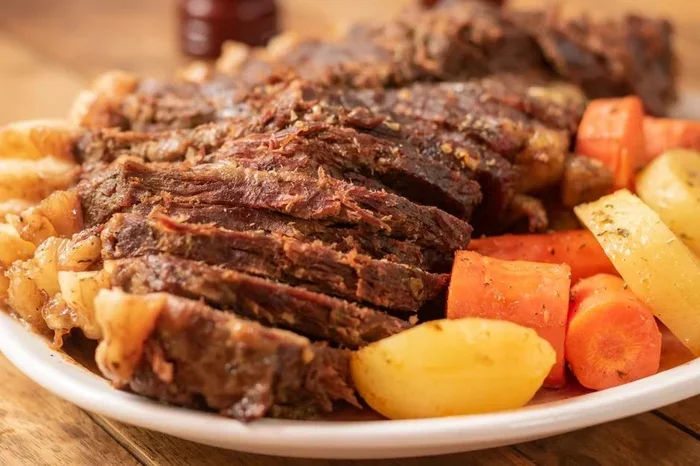
Pressure cooker corned beef is the easiest way to get tender, juicy results every time. This simple step by step recipe walks you through seasoning, cooking, and slicing your corned beef brisket with minimal effort. You will learn the best cook times, tips for tender meat, and how to use the leftover cooking liquid for flavorful soups and sides.
Making corned beef at home does not have to be hard. A pressure cooker corned beef recipe takes all the guesswork out of the process. You get tender, flavorful meat in a fraction of the time compared to traditional methods. Whether you use a stovetop model or an electric one, the results are consistently great.
This step by step recipe covers everything from choosing the right brisket to slicing it perfectly. You will also learn how to use the cooking liquid for soups and sides. By the end, you will feel confident making corned beef any day of the week.
Key Takeaways
- Fast Cooking: A pressure cooker cuts corned beef cook time from hours to under two hours.
- Tender Results: Pressure cooking keeps corned beef juicy and easy to slice against the grain.
- Simple Ingredients: You need just a few pantry staples and your favorite corned beef seasoning.
- Versatile Leftovers: The cooking liquid makes a great base for soups and braised vegetables.
- Works with Any Cooker: Whether stovetop or electric, the method stays the same.
- Storage Friendly: Leftover corned beef stores well in the fridge for up to five days.
📑 Table of Contents
Why Use a Pressure Cooker for Corned Beef?
Traditional corned beef takes hours of simmering on the stovetop. A pressure cooker speeds this up dramatically. The sealed environment traps heat and pressure, which breaks down the tough fibers in the brisket much faster.
Here is why this method works so well:
- Faster cook times mean less time in the kitchen.
- Moisture stays locked in, so the meat never dries out.
- Even cooking ensures every slice is tender and juicy.
- Less cleanup since everything cooks in one pot.
Using a pressure cooker for corned beef is a game changer. The meat comes out falling apart tender, yet still sliceable. This method works especially well for beginners who want reliable results without watching the pot all day.
Pressure Cooker vs. Stovetop Simmering
Simmering corned beef on the stove can take three to four hours. A pressure cooker does the same job in about one to two hours. The pressure cooking process uses high heat and steam to penetrate the meat deeply.
Another big advantage is flavor. Because the lid seals tight, none of the aromatic steam escapes. All those spices and seasonings stay locked inside with the meat. The result is a deeper, richer flavor profile compared to open-pot simmering.
What You Need to Get Started
Before you start cooking, gather your ingredients and tools. Having everything ready makes the process smooth and stress free.
Ingredients for Pressure Cooker Corned Beef
- Corned beef brisket (about 2 to 3 pounds)
- Water or beef broth for the cooking liquid
- Corned beef seasoning packet (or make your own blend)
- Whole peppercorns and bay leaves for extra flavor
- Garlic cloves and onion quarters (optional but recommended)
- Apple cider vinegar (a splash helps tenderize)
Equipment You Will Need
- A pressure cooker (stovetop or electric)
- A trivet or steamer insert
- Sharp knife for slicing
- Large cutting board
- Tongs for handling the brisket
If you are shopping for a new cooker, check out our guide on the best 8 qt multi function pressure cooker for reliable options. A good cooker makes all the difference in getting consistent results.
Step by Step Pressure Cooker Corned Beef Recipe
Follow these simple steps for perfect corned beef every time. This method works with both electric and stovetop pressure cookers.
Step 1: Rinse and Prep the Brisket
Take your corned beef brisket out of the packaging. Rinse it under cold water to remove excess salt from the brine. Pat it dry with paper towels. This step helps control the final saltiness of the meat.
Place the brisket on your cutting board and look for any thick fatty areas. You can trim a thin layer of fat if you prefer, but leave enough to keep the meat moist during cooking.
Step 2: Add Liquid and Seasonings
Add about two cups of water or beef broth to your pressure cooker. Pour in the seasoning packet that came with the brisket. For extra depth of flavor, add a few whole peppercorns, two bay leaves, and three to four garlic cloves.
A splash of apple cider vinegar (about one tablespoon) helps break down the tough connective tissue. This leads to more tender results. Stir the liquid gently to dissolve the seasonings.
Step 3: Place the Brisket in the Cooker
Set the brisket on the trivet or steamer insert. Place it fat side up so the fat layer melts and bastes the meat during cooking. Make sure the brisket sits above the liquid level.
Do not stack or overlap the meat. The brisket should lie flat in the cooker. If your cooker is small, you may need to trim the brisket slightly to fit.
Step 4: Seal and Pressurize
Lock the lid of your pressure cooker in place. For electric models, select the high pressure setting. For stovetop models, bring the cooker to high pressure over medium high heat, then reduce to low heat to maintain pressure.
Set your timer based on the weight of the brisket:
- 2 pounds: 60 minutes at high pressure
- 3 pounds: 75 minutes at high pressure
- 4 pounds or more: 90 minutes at high pressure
Step 5: Natural Pressure Release
Once the timer goes off, let the pressure release naturally for at least 15 minutes. Do not use the quick release method. Natural release allows the meat to finish cooking gently and keeps it from becoming tough.
After 15 minutes, carefully release any remaining pressure. Open the lid and use tongs to lift the brisket out. Place it on a cutting board and let it rest for 10 minutes.
Step 6: Slice and Serve
Use a sharp knife to slice the corned beef against the grain. This is the most important step for tender slices. If you cut with the grain, the meat will be chewy no matter how well it cooked.
Slice the pieces about a quarter inch thick for the best texture. Serve with your favorite sides like cabbage, potatoes, or mustard.
Tips for the Most Tender Corned Beef
Getting tender corned beef comes down to a few key details. Follow these tips and your results will improve every time.
Choose the Right Cut
Look for a brisket with good marbling throughout the meat. The fat distributes flavor and moisture during cooking. Avoid cuts that look dry or have large hard chunks of fat.
If you see a “point cut” and a “flat cut” at the store, the point cut tends to be more marbled and forgiving. It works beautifully in a pressure cooker.
Do Not Skip the Resting Step
Letting the meat rest after cooking is essential. The juices redistribute throughout the brisket during this time. Cutting too early causes the juices to run out, leaving dry meat behind.
Ten minutes of resting makes a noticeable difference in tenderness and flavor.
Always Slice Against the Grain
The grain of the meat refers to the direction of the muscle fibers. Slicing against the grain shortens those fibers, making each bite easier to chew. Look for the lines in the meat and cut perpendicular to them.
If you are unsure which direction the grain runs, try slicing a small test piece first. Adjust your cutting angle based on what you see.
Save and Reuse the Cooking Liquid
Do not throw away the liquid left in the pressure cooker after cooking. It is packed with flavor from the brisket and seasonings. Strain it and use it as a base for soups, stews, or braised vegetables.
The cooking liquid also makes an excellent base for leftover corned beef hash or a hearty beef soup. It adds a rich, savory depth that store bought broth cannot match.
Common Mistakes to Avoid
Even with a simple recipe, a few common mistakes can ruin your corned beef. Here is what to watch out for.
Using Too Much Water
Your pressure cooker should only be one third full at most. Too much liquid can affect the pressure balance and lead to soggy meat. Use just enough liquid to create steam and build pressure.
Skipping the Rinse
Corned beef comes pre cured in a salty brine. If you do not rinse it, your final dish can end up way too salty. A quick rinse under cold water removes the excess surface salt without washing away the flavor.
Cutting With the Grain
This mistake turns tender meat into something tough and chewy. Always identify the grain direction and cut perpendicular to it. Take a moment to look at the meat before you start slicing.
Using Quick Release for Large Cuts
Quick release works great for vegetables and grains. But for large, tough cuts like corned beef brisket, natural release is the better choice. It gives the collagen time to break down fully, resulting in more tender meat.
Delicious Ways to Use Leftover Corned Beef
One of the best things about making corned beef in a pressure cooker is the leftovers. You get plenty of meat to use in multiple meals throughout the week.
Here are some easy ideas:
- Corned beef hash with diced potatoes and onions for breakfast.
- Reuben sandwiches with sauerkraut and Swiss cheese.
- Corned beef soup using the reserved cooking liquid as the base.
- Corned beef and cabbage stir fry with fresh veggies.
- Corned beef eggs Benedict for a special weekend brunch.
Leftover corned beef stores well in the fridge for up to five days. Make sure to store it in an airtight container. For longer storage, you can freeze cooked corned beef for up to three months.
For tips on keeping your beef fresh, check out our guide on how to store beef properly.
Frequently Asked Questions
Can I Use a Different Liquid Instead of Water?
Yes, absolutely. Beef broth, dark beer, or even a mix of broth and apple cider vinegar all work well. Using a flavorful liquid adds extra depth to your corned beef. Just avoid using plain water if you want the richest results.
How Do I Know When the Corned Beef Is Done?
The internal temperature should reach at least 145 degrees Fahrenheit. But the best test is tenderness. Use a fork and try to pull apart a small section. If it shreds easily, it is done. The pressure cooker timer times are reliable guides, but always check the meat.
Can I Cook Frozen Corned Beef in the Pressure Cooker?
It is not recommended. Frozen meat does not cook evenly under pressure and can lead to unsafe results. Always thaw your brisket in the fridge overnight before cooking. This ensures even cooking and better texture.
What Is the Best Way to Reheat Leftover Corned Beef?
Steaming is the best method. Place slices in a steamer basket over simmering water for about 10 minutes. You can also reheat in a covered skillet with a splash of broth. Avoid microwaving, which tends to dry out the meat quickly.
Why Is My Corned Beef Tough After Pressure Cooking?
This usually happens when the cook time was too short or the pressure was not maintained. Another common cause is cutting with the grain instead of against it. If your meat is tough, try simmering it for an additional 15 minutes and always slice properly.
Can I Add Vegetables to the Pressure Cooker with the Corned Beef?
Yes, you can add hearty vegetables like carrots, potatoes, and onions. Place them around or below the brisket on the trivet. Just reduce the cook time slightly by about 10 minutes since the vegetables will also release moisture into the cooker.
Final Thoughts
Making pressure cooker corned beef is one of the simplest and most rewarding things you can do in the kitchen. The process is straightforward, the results are impressive, and the cleanup is minimal. You get tender, flavorful meat that works for a holiday dinner or a casual weeknight meal.
Follow this step by step recipe and you will never go back to slow simmering again. The pressure cooker delivers consistent, juicy corned beef in a fraction of the time. Once you try it, you will wonder how you ever cooked corned beef any other way.
Grab a brisket, fire up your cooker, and give this recipe a try today. Your family will thank you for it.



